Thursday, February 28, 2019
List of Some Popular iOS Printing Apps
1. List of Some Popular iOS Printing Apps
There are also some iOS printing apps that you can use to print files from your iPhone without the AirPrint. Some of the most popular iOS printing apps that you can use include the following;
Printer Pro
This iOS app can help you print files from your iPhone very easily by connecting the iPhone wirelessly to a printer. It supports a wide range of file formats that include PDF, HTML, JPG and TXT. It is available on the app store for $4.99 and it is quite easy to use.
HP ePrint
As the name suggests, this is a HP printer app that allows you to print any file on a HP Printer that is connected to the iPhone via Wi-Fi. It is completely free to download.
Epson iPrint
This is the companion app for Epson wireless printers and can be used to print files from your iPhone via a wireless Epson printer. Epson iPrint is also free to download and can also be used to scan documents and images to your phone.
Sponsor ads:Best 5 Android Apps to Change Photo Backgrounds
Sponsor ads:5 Best Video to MP3 Converter to Extract Audio from Video FilesSponsor ads:How to Go Live on Tik Tok/Musical.ly in 2019
How to print from iPhone
To print files from your iPhone using one of the apps above, follow these simple steps;
Step 1: Install your preferred iOS printing app on to your device.
Step 2: Each app will have different set-up instructions. Open the app of your choice and then follow the instructions to set it up.
Step 3: Open a wireless connection between the iPhone and the printer.
Step 4: On your iPhone, tap on “Add Printer” and the device will search for the wireless printer.
Step 5: Open the file you want to print, select “Print” and then choose the printer model.Sponsor ads:
Gihosoft Free iPhone Data Recovery:https://www.gihosoft.com/iphone-data-recovery-free.html
Gihosoft iPhone Data Recovery Free
Free iPhone Data Recovery Software for Windows/Mac
Recover up to 12+ types of files, including contacts, SMS, photos, WhatsApp, Viber, notes, etc.
Restore lost data from iOS devices directly or from iTunes and iCloud backup
Recover iPhone data lost due to iOS upgrade/jailbreak, accidental deletion, device lost or broken
Support all the latest iPhone, iPad and iPod Touch
Both Free and Pro version.
If you lost data after you updated to a new iPhone, you can always use Gihosoft iPhone Data Recovery to get the data back from the old iPhone or backup.You may also like: iphonerecovery.com
If you use android phones, please choose Gihosoft Android Data Recovery.
With Gihosoft Android Data Recovery, no longer afraid of data loss!
Must read:Youtube video downloader for pc
Gihosoft RePicvid Free Photo Recovery Software provides a free photo recovery software for windows to help users recover the deleted or lost photo for free.
Jihosoft Android Data Recovery: the best Android Data Recovery software for Windows and Mac to recover deleted contacts, messages, photos, videos, WhatsApp and etc from Android devices.Tips:How to transfer messages from iPhone to iPhone
jihosoft Free iPhone Data Recovery
Wednesday, February 27, 2019
How to Remove Authorized Devices from Your iTunes?
How to Remove Authorized Devices from Your iTunes?
If you want to sell or give away an associated device, you can eliminate the Apple IDs you have previously logged in to your iTunes by following these simple steps:
From a computer:
Launch iTunes and sign in with your Apple ID.
Choose “Account” from the menu bar at the top and select “View Account” from the drop-down list.
Type in your password and press enter.
Select “Manage devices” in the iTunes section and delete the devices you no longer want to allow access to your iTunes.
From iPhone, iPod or iPad:
Open “Settings” and select the iTunes and App Store option
Click on your Apple ID
Select to view your Apple ID and enter password
Go to the iTunes section and select the devices to be removed.
All in all, TunesMate is your first choice to transfer unlimited Apple Music libraries to multiple devices as an alternative of Apple Music Family Plan.Sponsor ads:
Gihosoft Free iPhone Data Recovery:https://www.gihosoft.com/iphone-data-recovery-free.html
Gihosoft iPhone Data Recovery Free
Free iPhone Data Recovery Software for Windows/Mac
Recover up to 12+ types of files, including contacts, SMS, photos, WhatsApp, Viber, notes, etc.
Restore lost data from iOS devices directly or from iTunes and iCloud backup
Recover iPhone data lost due to iOS upgrade/jailbreak, accidental deletion, device lost or broken
Support all the latest iPhone, iPad and iPod Touch
Both Free and Pro version.
If you lost data after you updated to a new iPhone, you can always use Gihosoft iPhone Data Recovery to get the data back from the old iPhone or backup.You may also like: iphonerecovery.com
If you use android phones, please choose Gihosoft Android Data Recovery.
With Gihosoft Android Data Recovery, no longer afraid of data loss!
Must read:Youtube video downloader for pc
Gihosoft RePicvid Free Photo Recovery Software provides a free photo recovery software for windows to help users recover the deleted or lost photo for free.
Jihosoft Android Data Recovery: the best Android Data Recovery software for Windows and Mac to recover deleted contacts, messages, photos, videos, WhatsApp and etc from Android devices.Tips:How to transfer messages from iPhone to iPhone
jihosoft Free iPhone Data Recovery
How to Enter DFU Mode in iPhone Using Tools? 2019
When failing to factory reset your iPhone, you can give DFU mode a shot. Here in this post we share with you top 5 free DFU tools for you to put iPhone in DFU mode. Also you will find a DFU alternative here for completely resetting your iPhone.
Part 1: What is DFU Mode?
Part 2: Top 5 iPhone DFU Tools
Part 3: How to Completely Delete and Erase iPhone with DFU Mode Alternative?
Part 1: What is DFU Mode?
The acronym "DFU" stands for “Device Firmware Upgrade”. It’s the deepest type of iPhone restore but remains an essential smartphone restore mode that allows all devices to be restored from any state.

iPhone DFU mode is important in updating the firmware, jailbreak, rescuing an unresponsive iPhone, or installing an older version of iOS. This restore mode can be used to solve many other iPhone and iOS problems.
Part 2: Top 5 iPhone DFU Tools
To put iPhone in DFU mode, there are many apps and software that can be of help. Some of these tools have been shared in the following paragraphs.
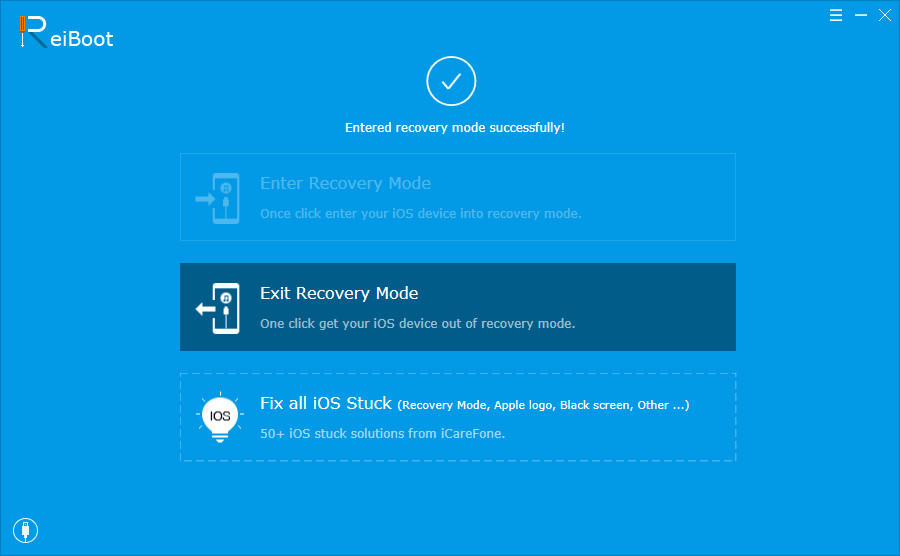
Top #1 DFU Tool: Tenorshare Reiboot
Reiboot is one of the most popular iPhone DFU mode tools. Reiboot can work to fix any iPhone stuck problems without losing data especially when your iPhone crashes, or stuck in any mode. All it requires is 1-click to exit recovery mode and restore your iPhone to factory settings. It can be used to repair even the most recent version of iOS.
Pros:
It’s free of charge, and you can enter DFU mode without losing data or entering recovery mode.
It’s user-friendly and can recommend other possible solutions when it can’t solve the problem.
Cons:
It crashes sometimes when in auto-launch.
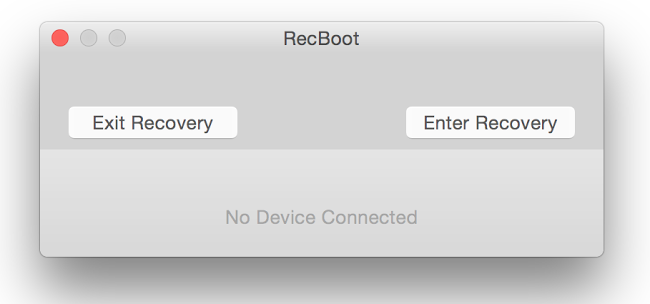
Top #2 DFU Tool: RecBoot
The features of RecBoot is similar to that of Tenorshare’s Reiboot in many ways. RecBoot can help you to reboot iPhone, iPad or iPod touch for free by clicking only two tabs on the interface that would enter/exit your iPhone to/from recovery mode respectively. Your iPhone will restart automatically when you’ve exited recovery mode.
Pros:
RecBoot is very easy to use, and the interface is friendly.
It’s free of charge.
Cons:
It doesn’t work on the 64-bit operating system.
Top #3 DFU Tool: Tiny Umbrella
Tiny Umbrella as an iPhone tool wasn’t primarily meant for putting iPhone into DFU mode, but this is one of the tiny features in this iPhone tool. However, this tool is doing just fine in entering and exiting iPhones to/from DFU mode, after which your device will be forced to reboot.

Pros:
It can restore your iOS to older versions.
It has several features and serves as a multi-functional iPhone tool.
Cons:
It may not detect your device sometimes.
It poses a great risk to iPhone data and can render your precious data unrecoverable.
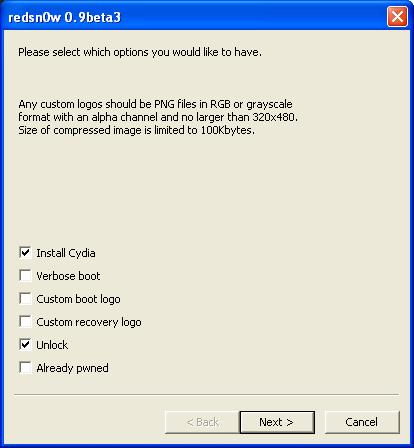
Top #4 DFU Tool: RedSn0w
RedSn0w primary feature is to jailbreak iPhones, iPads and iPod touches. However, this tool still offers some features in recovery fix. You can easily enter or exit DFU mode with this software. You can reboot your iDevice after using this tool.
Pros:
It offers other features outside recovery/DFU mode.
It would help to prevent endless loops of recovery mode that arises when you jailbreak your iPhone.
Cons:
The latest version of this tool is not compatible with most recent versions of iOS.
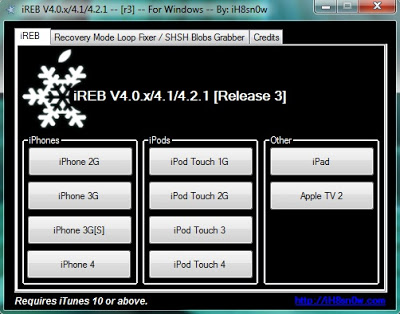
Top #5 DFU Tool: iReb
The software iReb can be useful in restoring iPhones, iPads, or iPod touches in any condition such as recovery mode, Apple logo, iPhone crash, or unresponsive iPhone.
Pros:
It functions well on all PCs and operating systems.
It’s a simple app with three tabs, which makes it easy to use.
Cons:
There is a high probability that you’ll end up losing your data.
It’s not a good option if you’re concerned with safeguarding your iOS data.
Sponsor ads:
Gihosoft Free iPhone Data Recovery:https://www.gihosoft.com/iphone-data-recovery-free.html
Gihosoft iPhone Data Recovery Free
Free iPhone Data Recovery Software for Windows/Mac
Recover up to 12+ types of files, including contacts, SMS, photos, WhatsApp, Viber, notes, etc.
Restore lost data from iOS devices directly or from iTunes and iCloud backup
Recover iPhone data lost due to iOS upgrade/jailbreak, accidental deletion, device lost or broken
Support all the latest iPhone, iPad and iPod Touch
Both Free and Pro version.
If you lost data after you updated to a new iPhone, you can always use Gihosoft iPhone Data Recovery to get the data back from the old iPhone or backup.You may also like: iphonerecovery.com
If you use android phones, please choose Gihosoft Android Data Recovery.
With Gihosoft Android Data Recovery, no longer afraid of data loss!
Must read:Youtube video downloader for pc
Gihosoft RePicvid Free Photo Recovery Software provides a free photo recovery software for windows to help users recover the deleted or lost photo for free.
Jihosoft Android Data Recovery: the best Android Data Recovery software for Windows and Mac to recover deleted contacts, messages, photos, videos, WhatsApp and etc from Android devices.Tips:How to transfer messages from iPhone to iPhone
jihosoft Free iPhone Data Recovery
How to Tell if Someone Blocked You on Facebook Messenger 2019
How to Tell if Someone Blocked You on Facebook Messenger 2019
Have you tried to send someone a message on Facebook Messenger only for it to miss its mark? If you had sent a message to this person before with some success, it is safe to assume that person has blocked you. But how can you know for sure? In this article, we attempt to answer that question.
But before we begin with the question on how you can tell you've been blocked on Facebook Messenger, you should know that there are two ways someone can stop to receive your messages from Facebook Messenger. They include the following;
The person can chooses to stop receiving messages from you on Facebook Messenger.
They can also block on you Facebook which can prevent you from sending them messages on Messenger.
That said the following are just some of the ways to tell is someone has blocked you on Facebook Messenger.
1. Try to Send the Person a Message on Your Phone
2. Try to Send the Person a Message on Your Computer
3. Additional Tip: Back Up Your Facebook Messages
1. Try to Send the Person a Message on Your Phone
The first way to find out if someone has blocked you on Facebook Messenger is to send them a message on your phone or tablet. Follow these simple steps to do it;
Step 1: Open Facebook Messenger app on your phone or tablet.
Step 2: Type your friend's name in the search box located at the top of the screen. You should see a list of names matching the one you typed in appear below the search box.
Step 3: Tap on your friend's name to begin chatting with them and then type a message to send to them.
Step 4: Once you're done tying the message, tap on the send icon. If you see a pop up saying "The person isn't available right now", the person has blocked you or deactivated their Facebook account.

If the message is sent successfully, the person has not blocked you. It is likely they just haven't logged or read their messages in a while.
Step 5. Then how to know the person has blocked you or deactivated their Facebook account? Just run Facebook on your phone and search the friends' name. If their profile appears normal, then they have blocked your messages. If you cannot find their profile but your mutual friends can see that, unfortunately your entire Facebook account has been blocked.
2. Try to Send the Person a Message on Your Computer
You can also check if someone has blocked you on Facebook Messenger on your computer. Follow these simple steps;
Step 1: Go to https://www.messenger.com to access Facebook Messenger on any browser.
Step 2: Sign in to your account and you'll see a list of conversations.
Step 3: In the search box at the top-left corner of the screen, type in the person's name. You should see a list of names appear as you type.
Step 4: Click on the person's name to begin chatting with the person.
Step 5: Type your message in the chat box and then press "Enter" or "Return" on your keyboard to send the message. If you see a message saying "This person isn't available right now," the person has blocked your messages or deactivated their Facebook account.

If the message is sent successfully, the person may not have logged in to their account or hasn't had time to check their messages.
Step 6. The next is to confirm whether the person deactivated their Facebook account or blocked you messages. Just sign in to https://www.facebook.com and check their profile. If their profile looks normal, then your Messenger has been blocked. If you cannot find their profile but your other friends can see that, then your entire Facebook has been blocked.
3. Additional Tip: Back Up Your Facebook Messages
Sponsor ads:
Gihosoft Free iPhone Data Recovery:https://www.gihosoft.com/iphone-data-recovery-free.html
Gihosoft iPhone Data Recovery Free
Free iPhone Data Recovery Software for Windows/Mac
Recover up to 12+ types of files, including contacts, SMS, photos, WhatsApp, Viber, notes, etc.
Restore lost data from iOS devices directly or from iTunes and iCloud backup
Recover iPhone data lost due to iOS upgrade/jailbreak, accidental deletion, device lost or broken
Support all the latest iPhone, iPad and iPod Touch
Both Free and Pro version.
If you lost data after you updated to a new iPhone, you can always use Gihosoft iPhone Data Recovery to get the data back from the old iPhone or backup.You may also like: iphonerecovery.com
If you use android phones, please choose Gihosoft Android Data Recovery.
With Gihosoft Android Data Recovery, no longer afraid of data loss!
Must read:Youtube video downloader for pc
Gihosoft RePicvid Free Photo Recovery Software provides a free photo recovery software for windows to help users recover the deleted or lost photo for free.
Jihosoft Android Data Recovery: the best Android Data Recovery software for Windows and Mac to recover deleted contacts, messages, photos, videos, WhatsApp and etc from Android devices.Tips:How to transfer messages from iPhone to iPhone
jihosoft Free iPhone Data Recovery
Have you tried to send someone a message on Facebook Messenger only for it to miss its mark? If you had sent a message to this person before with some success, it is safe to assume that person has blocked you. But how can you know for sure? In this article, we attempt to answer that question.
But before we begin with the question on how you can tell you've been blocked on Facebook Messenger, you should know that there are two ways someone can stop to receive your messages from Facebook Messenger. They include the following;
The person can chooses to stop receiving messages from you on Facebook Messenger.
They can also block on you Facebook which can prevent you from sending them messages on Messenger.
That said the following are just some of the ways to tell is someone has blocked you on Facebook Messenger.
1. Try to Send the Person a Message on Your Phone
2. Try to Send the Person a Message on Your Computer
3. Additional Tip: Back Up Your Facebook Messages
1. Try to Send the Person a Message on Your Phone
The first way to find out if someone has blocked you on Facebook Messenger is to send them a message on your phone or tablet. Follow these simple steps to do it;
Step 1: Open Facebook Messenger app on your phone or tablet.
Step 2: Type your friend's name in the search box located at the top of the screen. You should see a list of names matching the one you typed in appear below the search box.
Step 3: Tap on your friend's name to begin chatting with them and then type a message to send to them.
Step 4: Once you're done tying the message, tap on the send icon. If you see a pop up saying "The person isn't available right now", the person has blocked you or deactivated their Facebook account.
If the message is sent successfully, the person has not blocked you. It is likely they just haven't logged or read their messages in a while.
Step 5. Then how to know the person has blocked you or deactivated their Facebook account? Just run Facebook on your phone and search the friends' name. If their profile appears normal, then they have blocked your messages. If you cannot find their profile but your mutual friends can see that, unfortunately your entire Facebook account has been blocked.
2. Try to Send the Person a Message on Your Computer
You can also check if someone has blocked you on Facebook Messenger on your computer. Follow these simple steps;
Step 1: Go to https://www.messenger.com to access Facebook Messenger on any browser.
Step 2: Sign in to your account and you'll see a list of conversations.
Step 3: In the search box at the top-left corner of the screen, type in the person's name. You should see a list of names appear as you type.
Step 4: Click on the person's name to begin chatting with the person.
Step 5: Type your message in the chat box and then press "Enter" or "Return" on your keyboard to send the message. If you see a message saying "This person isn't available right now," the person has blocked your messages or deactivated their Facebook account.
If the message is sent successfully, the person may not have logged in to their account or hasn't had time to check their messages.
Step 6. The next is to confirm whether the person deactivated their Facebook account or blocked you messages. Just sign in to https://www.facebook.com and check their profile. If their profile looks normal, then your Messenger has been blocked. If you cannot find their profile but your other friends can see that, then your entire Facebook has been blocked.
3. Additional Tip: Back Up Your Facebook Messages
Sponsor ads:
Gihosoft Free iPhone Data Recovery:https://www.gihosoft.com/iphone-data-recovery-free.html
Gihosoft iPhone Data Recovery Free
Free iPhone Data Recovery Software for Windows/Mac
Recover up to 12+ types of files, including contacts, SMS, photos, WhatsApp, Viber, notes, etc.
Restore lost data from iOS devices directly or from iTunes and iCloud backup
Recover iPhone data lost due to iOS upgrade/jailbreak, accidental deletion, device lost or broken
Support all the latest iPhone, iPad and iPod Touch
Both Free and Pro version.
If you lost data after you updated to a new iPhone, you can always use Gihosoft iPhone Data Recovery to get the data back from the old iPhone or backup.You may also like: iphonerecovery.com
If you use android phones, please choose Gihosoft Android Data Recovery.
With Gihosoft Android Data Recovery, no longer afraid of data loss!
Must read:Youtube video downloader for pc
Gihosoft RePicvid Free Photo Recovery Software provides a free photo recovery software for windows to help users recover the deleted or lost photo for free.
Jihosoft Android Data Recovery: the best Android Data Recovery software for Windows and Mac to recover deleted contacts, messages, photos, videos, WhatsApp and etc from Android devices.Tips:How to transfer messages from iPhone to iPhone
jihosoft Free iPhone Data Recovery
Tuesday, February 26, 2019
Fix iTunes Error 3259 – Here are the Easiest Ways!
Fix iTunes Error 3259 – Here are the Easiest Ways!
There are many variations in “iTunes Network Connection Timed Out”, but the most named is ‘iTunes Error -3259’. This error mostly occurs when downloading or updating an app on your iPhone, iPad or iPod touch via iTunes Store. Once Error -3259 pops up, you’ll find out that you are unable to complete the download. Learn what to do to stop this error message from reoccurring in the following paragraphs.
The Symptoms and Reasons for iTunes Error -3259
How do you know that you are experiencing iTunes error -3259? The answer is simple – iTunes will get to notify you. Hence, we’ve listed some common iTunes notifications when error -3259 occurred:
“iTunes could not connect to the App Store. An unknown error occurred (error 3259). Make sure your network connection is active and try again”
“There was an error downloading your music (error 3259)”
“Cannot connect to iTunes Store. An unknown error has occurred”
On the other hand, the major reason for iTunes Error -3259 is due to problems with iTunes download center. Another reason for this error is ‘incorrect settings in Windows OS’.
Part 1: How to Fix iTunes Error 3259
Part 2: The Best Alternative of iTunes
How to Fix iTunes Error 3259
From the above, it’s evident that these iTunes notifications concerning Error -3259 are not helpful. Therefore, we shall be giving you some tips that would help you to fix iTunes error -3259.
#1. Update Your iTunes to the Latest Version
When last did you update your iTunes? If you’ve not recently updated your iTunes, then using an obsolete version of iTunes may be the cause of Error 3259. Here is how to update your iTunes to the latest version:
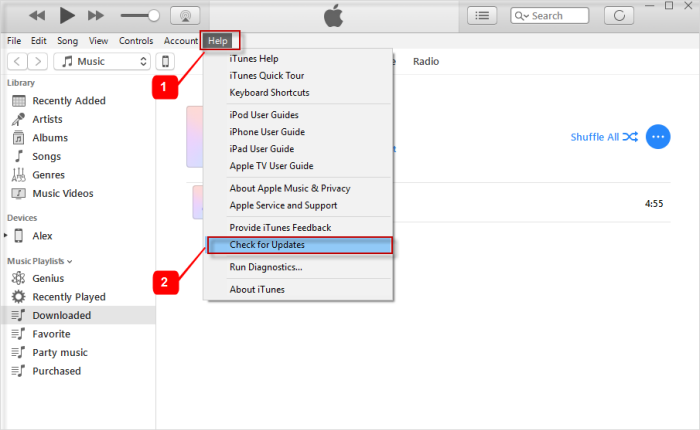
Step 1: Launch iTunes.
Step 2: Go to the menu bar and click Help > Check for Updates.
Step 3: Follow the easy prompts to install the latest version of iTunes.
#2. Uninstall and Re-install iTunes
If updating to the latest version of iTunes did not stop the Error -3259 notification, then uninstalling iTunes and re-installing its latest version can help to solve the iTunes Error 3259 you are facing. The steps listed below are of two parts: the first part deals with how to uninstall iTunes, while the second part handles how to install the latest version of iTunes.
Uninstalling iTunes: Go to your Windows’ Control Panel and uninstall iTunes with the following components in this order:
iTunes,
Apple Software Update,
Apple Mobile Device Support,
Bonjour,
Apple Application Support 32-bit,
Apple Application Support 64-bit.

Check to know whether iTunes installed two versions of any of the programs. If it did, do uninstall all of them before restarting your PC.
Installing Latest Version of iTunes: Download and install the latest version of iTunes for PC here. Try downloading your songs again with iTunes to see if the iTunes Error 3259 persists.
#3. Allow iTunes in Your Windows Firewall
When Windows Firewall is enabled, it prevents iTunes from accessing network connection unless iTunes is listed as an exception. Here is how to allow iTunes in Windows Firewall:
Step 1: Press the Windows key, and click on the Search icon and in the search field enter “firewall.cpl.Note Tips: Top 3 Alternative Sites to TamilDbox 2019
Also Read:8
Best Chess Apps for iPhone & iPad 2019
Step 2: click “firewall.cpl” > “Allow an app or feature through Windows Firewall” > “Change Settings”.
Step 3: Check to see if iTunes is selected for both private and public network, and Bonjour selected for the private network only.
Step 4: If iTunes and Bonjour are not listed, then go to C:/Program Files/iTunes/ or C:/Program Files/Bonjour/ for iTunes and Bonjour respectively. Then open the files, and click “Add” in the Add an app window.Sponsor ads:Setup Dual Monitors in Windows 10 Computer 2019
Step 5: Once they have been added, you can now click OK on the Allowed app window.
Step 6: iTunes is now allowed, and you can close the Windows Firewall.

#4. Disable Windows Firewall and Antivirus
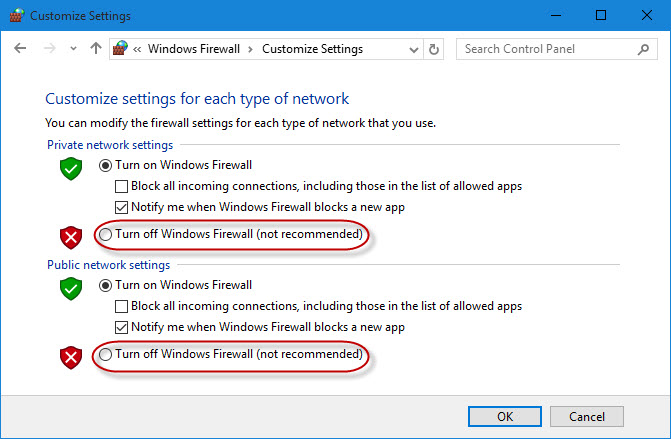
Oftentimes, disabling your Windows firewall and Antivirus would help to cease the iTunes Error 3259 that follows. Here are steps to disabling Windows firewalls and Antivirus:
Step 1: Open your Window’s Control Panel, and click System and Security > Windows Firewall.
Step 2: Disable Windows Firewall by clicking “Turn Windows Firewall off”.
Step 3: Click “OK”.
You can enable your antivirus when iTunes is running well again.
The Best Alternative of iTunes – iMyFone TunesMate
Restoring my old backup after buying iPhone X 2019
Restoring my old backup after buying iPhone X 2019
Question
Hi, I was restoring my old backup after buying iPhone X but my iCloud backup is not showing up. What is the problem? Can you tell me?
It can be a little troublesome when you are not able to see your iCloud backup especially when you need restoring it. This can happen for various reasons which we will be explain to you next. Also, we have brought a very useful fix that you can to try out when iCloud backup doesn't show up during the restoring process. Let us begin now.

1. Why iCloud Backup Is Not Showing up?
2. View or Extract iCloud Backup with iMyFone D-Port
Also Read:Rotate Video on Facebook 2019
3. Restore iPhone from iCloud Backup Selectively
1. Why iCloud Backup Is Not Showing up?
First of all, you need to understand why this thing is taking place. Here are the common potential reasons behind it.
Network Connection: You should be aware about the fact that a cloud service always seeks a very active internet connection. If iCloud backup is not showing up, the primary reason could be your network connection . Make sure to work with a healthy and stable internet at all times to make the iCloud service smoother. You may try to reset your router and the network settings on your iPhone.
Apple server problem: Another cause of iCloud backup not showing up issue could be Apple server problem . Sometimes, the server may be in maintenance and it is impossible to connect to the server, so you are unable to view the backup files. We recommend that you go to check Apple System Status when this problem happens and confirm if there is any server issue.
Unsuccessful backup: Another thing you should be acquainted with while working with iCloud is that the service offers a limited amount of storage to save your files i.e. 5GB, so it is possible that you backup was not made successfully due to less storage. Also, some other unknown errors with the internet will also cause this problem.
Corrupt or incompatible iCloud backup: Finally, it could also be a corrupt or incompatible iCloud backup so that it cannot be restored to the iOS device.
If you still have a chance to make a new iCloud backup containing the data you want, you can just cancel the old backup iCloud and then do a new iCloud backup again. Here is how to delete the old backup:
Go to Settings on your iPhone, click your user name on the top, click iCloud, and then you will be able to manage the storage of your iCloud by click Manage Storage.

After that, you need click Backup and you will see all the backups in your iCloud. At this moment, you can choose a backup and click "Delete Backup".

If you have no chance to make a new backup of the data, you can try the method below to view and extract the data in your old iCloud backup.
Sponsor ads:
Gihosoft Free iPhone Data Recovery:https://www.gihosoft.com/iphone-data-recovery-free.html
Gihosoft iPhone Data Recovery Free
Free iPhone Data Recovery Software for Windows/Mac
Recover up to 12+ types of files, including contacts, SMS, photos, WhatsApp, Viber, notes, etc.
Restore lost data from iOS devices directly or from iTunes and iCloud backup
Recover iPhone data lost due to iOS upgrade/jailbreak, accidental deletion, device lost or broken
Support all the latest iPhone, iPad and iPod Touch
Both Free and Pro version.
If you lost data after you updated to a new iPhone, you can always use Gihosoft iPhone Data Recovery to get the data back from the old iPhone or backup.You may also like: iphonerecovery.com
If you use android phones, please choose Gihosoft Android Data Recovery.
With Gihosoft Android Data Recovery, no longer afraid of data loss!
Must read:Youtube video downloader for pc
Gihosoft RePicvid Free Photo Recovery Software provides a free photo recovery software for windows to help users recover the deleted or lost photo for free.
Jihosoft Android Data Recovery: the best Android Data Recovery software for Windows and Mac to recover deleted contacts, messages, photos, videos, WhatsApp and etc from Android devices.Tips:How to transfer messages from iPhone to iPhone
jihosoft Free iPhone Data Recovery
Also Read:Create Boomerang from Existing Videos on Android/iPhone 2019
Question
Hi, I was restoring my old backup after buying iPhone X but my iCloud backup is not showing up. What is the problem? Can you tell me?
It can be a little troublesome when you are not able to see your iCloud backup especially when you need restoring it. This can happen for various reasons which we will be explain to you next. Also, we have brought a very useful fix that you can to try out when iCloud backup doesn't show up during the restoring process. Let us begin now.
1. Why iCloud Backup Is Not Showing up?
2. View or Extract iCloud Backup with iMyFone D-Port
Also Read:Rotate Video on Facebook 2019
3. Restore iPhone from iCloud Backup Selectively
1. Why iCloud Backup Is Not Showing up?
First of all, you need to understand why this thing is taking place. Here are the common potential reasons behind it.
Network Connection: You should be aware about the fact that a cloud service always seeks a very active internet connection. If iCloud backup is not showing up, the primary reason could be your network connection . Make sure to work with a healthy and stable internet at all times to make the iCloud service smoother. You may try to reset your router and the network settings on your iPhone.
Apple server problem: Another cause of iCloud backup not showing up issue could be Apple server problem . Sometimes, the server may be in maintenance and it is impossible to connect to the server, so you are unable to view the backup files. We recommend that you go to check Apple System Status when this problem happens and confirm if there is any server issue.
Unsuccessful backup: Another thing you should be acquainted with while working with iCloud is that the service offers a limited amount of storage to save your files i.e. 5GB, so it is possible that you backup was not made successfully due to less storage. Also, some other unknown errors with the internet will also cause this problem.
Corrupt or incompatible iCloud backup: Finally, it could also be a corrupt or incompatible iCloud backup so that it cannot be restored to the iOS device.
If you still have a chance to make a new iCloud backup containing the data you want, you can just cancel the old backup iCloud and then do a new iCloud backup again. Here is how to delete the old backup:
Go to Settings on your iPhone, click your user name on the top, click iCloud, and then you will be able to manage the storage of your iCloud by click Manage Storage.
After that, you need click Backup and you will see all the backups in your iCloud. At this moment, you can choose a backup and click "Delete Backup".
If you have no chance to make a new backup of the data, you can try the method below to view and extract the data in your old iCloud backup.
Sponsor ads:
Gihosoft Free iPhone Data Recovery:https://www.gihosoft.com/iphone-data-recovery-free.html
Gihosoft iPhone Data Recovery Free
Free iPhone Data Recovery Software for Windows/Mac
Recover up to 12+ types of files, including contacts, SMS, photos, WhatsApp, Viber, notes, etc.
Restore lost data from iOS devices directly or from iTunes and iCloud backup
Recover iPhone data lost due to iOS upgrade/jailbreak, accidental deletion, device lost or broken
Support all the latest iPhone, iPad and iPod Touch
Both Free and Pro version.
If you lost data after you updated to a new iPhone, you can always use Gihosoft iPhone Data Recovery to get the data back from the old iPhone or backup.You may also like: iphonerecovery.com
If you use android phones, please choose Gihosoft Android Data Recovery.
With Gihosoft Android Data Recovery, no longer afraid of data loss!
Must read:Youtube video downloader for pc
Gihosoft RePicvid Free Photo Recovery Software provides a free photo recovery software for windows to help users recover the deleted or lost photo for free.
Jihosoft Android Data Recovery: the best Android Data Recovery software for Windows and Mac to recover deleted contacts, messages, photos, videos, WhatsApp and etc from Android devices.Tips:How to transfer messages from iPhone to iPhone
jihosoft Free iPhone Data Recovery
Also Read:Create Boomerang from Existing Videos on Android/iPhone 2019
Transfer Photos from Laptop to iPhone 2019
3 Ways to Transfer Photos from Laptop to iPhone
1. How to Transfer Photos from Laptop to iPhone Manually via iTunes
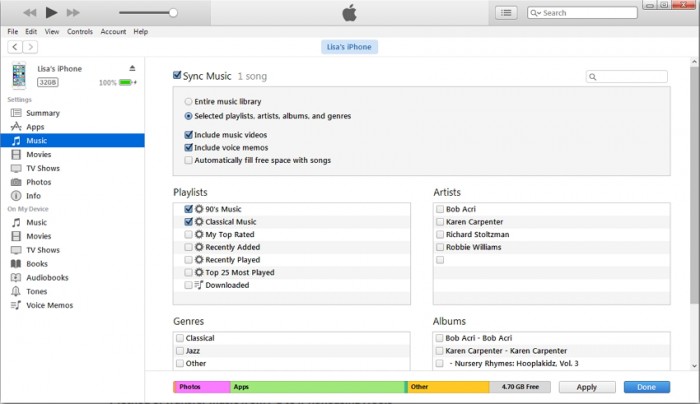
There are two ways you can setup iTunes to transfer your PC photos to iPhone, iPad or iPod touch – manual and automatic syncing. Syncing photos manually with iTunes updates your iOS device photos to match the albums on your laptop. Hence, if you’ve some photo albums on your PC that are not on your iPhone, you can follow these steps to import them.
Step 1: Update your iTunes to the latest version.
Step 2: Launch iTunes on your laptop, connect your iOS device with a USB cable and click the device icon on iTunes menu bar when it appears.
Step 3: Go to the side bar, and click the box next to “Sync Photos”.
Step 4: Select the app or folder you want to sync from, then choose from the listed syncing options, you can also choose to include videos.
Step 5: Click Apply.

2. How to Transfer Pictures from Laptop to iPhone via iExplorer
iExplorer is a simple iOS photo transfer tool. It’s easy to use and it gives you a good experience when transferring pictures from laptop to iPhone. However, the Photos section of iExplorer is read-only; it’s only designed for photo transfer and has no other functionalities. Following these steps to transfer your pictures from laptop to iPhone:
Step 1: Download and install iExplorer app on your PC/Mac.
Step 2: Launch and connect your iPhone, iPad or iPod touch to your PC/Mac with a USB cable. The program will automatically detect your device.
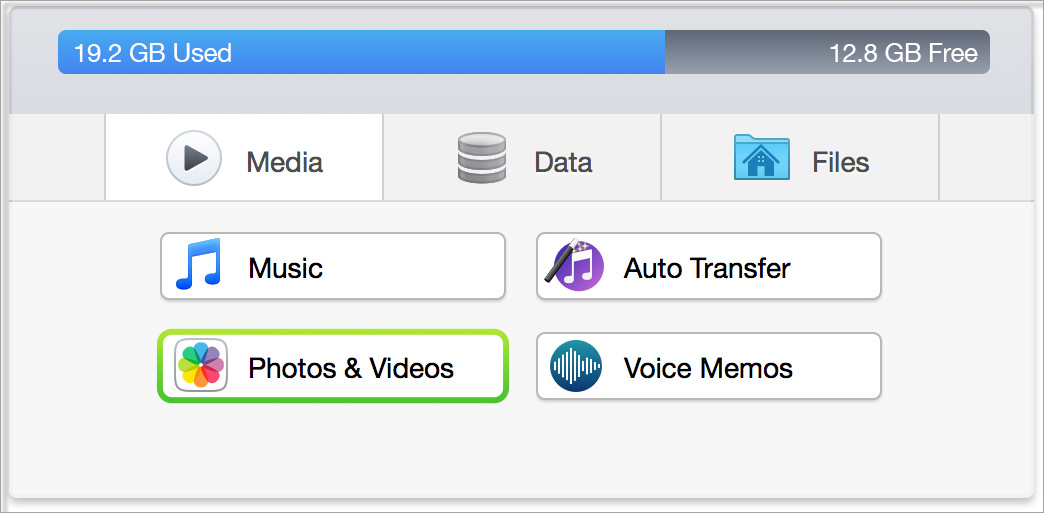
Step 3: Click the Video/Photo section, and all your videos and photos will be displayed. Drag and drop the photos from your PC/Mac to iPhone.
3. How to Transfer Pictures from Laptop to iPhone via Facebook
Facebook social media services can also be harnessed for file/photo transfer from laptop to iPhone. The first step is to open the Facebook app and click More > Photos > Albums. Then long press the photo you would like to download till the menu bar appears, click on save photos.
You may also like:
Sponsor ads:
Gihosoft Free iPhone Data Recovery:https://www.gihosoft.com/iphone-data-recovery-free.html
Gihosoft iPhone Data Recovery Free
Free iPhone Data Recovery Software for Windows/Mac
Recover up to 12+ types of files, including contacts, SMS, photos, WhatsApp, Viber, notes, etc.
Restore lost data from iOS devices directly or from iTunes and iCloud backup
Recover iPhone data lost due to iOS upgrade/jailbreak, accidental deletion, device lost or broken
Support all the latest iPhone, iPad and iPod Touch
Both Free and Pro version.
If you lost data after you updated to a new iPhone, you can always use Gihosoft iPhone Data Recovery to get the data back from the old iPhone or backup.You may also like: iphonerecovery.com
If you use android phones, please choose Gihosoft Android Data Recovery.
With Gihosoft Android Data Recovery, no longer afraid of data loss!
Must read:Youtube video downloader for pc
Gihosoft RePicvid Free Photo Recovery Software provides a free photo recovery software for windows to help users recover the deleted or lost photo for free.
Jihosoft Android Data Recovery: the best Android Data Recovery software for Windows and Mac to recover deleted contacts, messages, photos, videos, WhatsApp and etc from Android devices.Tips:How to transfer messages from iPhone to iPhone
jihosoft Free iPhone Data Recovery
Upload Photos to iCloud from iPhone 8/X
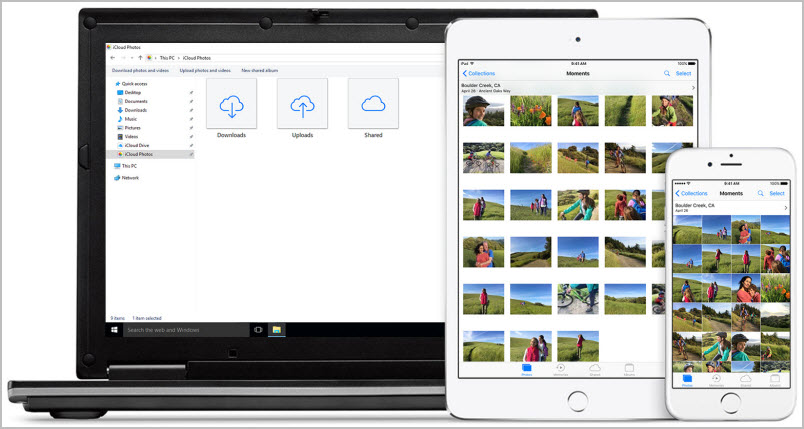
Online data storage has been available to people around the globe for a while now with many companies ranging wars to win over clients. Apple in attempting to fulfill the online data storage needs announced the iCloud Photo Library along with the photo app as a decent way of iOS users to manage and store their photos. With iCloud Photo Library it means that your iPhone 8/X photos will be safer and more secure as iCloud guarantees this than any hard drive could offer. It provides a very reliable way to back up your best moments that you can easily access on all your devices and share as long as you have an internet connection. It also assures one never to lose iPhone 8/X photos even if the device gets lost or permanently damaged.
Part 1: Upload Photos to iCloud from iPhone 8/X with iCloud Photo Library
Part 2: Manage Your Photos with Alternative to iCloud Photo Library
Part 1: Upload Photos to iCloud from iPhone 8/X with iCloud Photo Library
With iPhone 8/x running the latest iOS 11 then you can easily upload and store your photos to iCloud. Apple offers a 5 GB free iCloud storage space that you can use to upload and keep up to date any images on your iPhone 8/X. However, for your iPhone to back up your photos to iCloud you need to set that function from within your phone’s settings, after which, anytime that your iPhone 8/x is connected to Wi-Fi will automatically upload any new photos on your iDevice. To do this:
Step 1. Sign in to iCloud using your Apple ID on your iPhone 8/X by going to Settings > [Your Name] > iCloud
Step 2. After signing in then turn on the iCloud Photo Library by going to Settings > [Your Name] > iCloud > Photos and then turn on iCloud Photo Library
Once the iCloud Photo Library function has been set on your iDevice then your iPhone then it will automatically upload the photos to iCloud when your iDevice battery is charged up ensuring their security and safety and easy access on any of your other devices.

Part 2: Manage Your Photos with Alternative to iCloud Photo Library
Sponsor ads:Transfer Calendar from Android to Android
Sponsor ads:6 Best Running Apps For iPhone & Apple Watch to Keep Your Fitness
Sponsor ads:10 Best Game Download Sites for PC & Android
Transfer Music between iPhone 8/X and Computer with iTunes 2019
Transfer Music between iPhone 8/X and Computer with iTunes
Steps to Transfer Purchased Music from iPhone 8/X to Computer
The other plausible way that you can use to transfer music from your iPhone 8/X is through iTunes. To do this:
Step 1. On your computer open the iTunes application and then connect your iPhone 8/X with a USB cable that came with your iDevice.
Step 2. Wait for your iPhone to be detected.
Step 3. From the iTunes menu bar on top, click on file and then scroll down to devices.
Step 4. From the submenu that pops out select “Transfer purchases from iPhone.”

Step 5. Ones you click on it this will transfer all the purchased files from your iphone8/x to your computer.
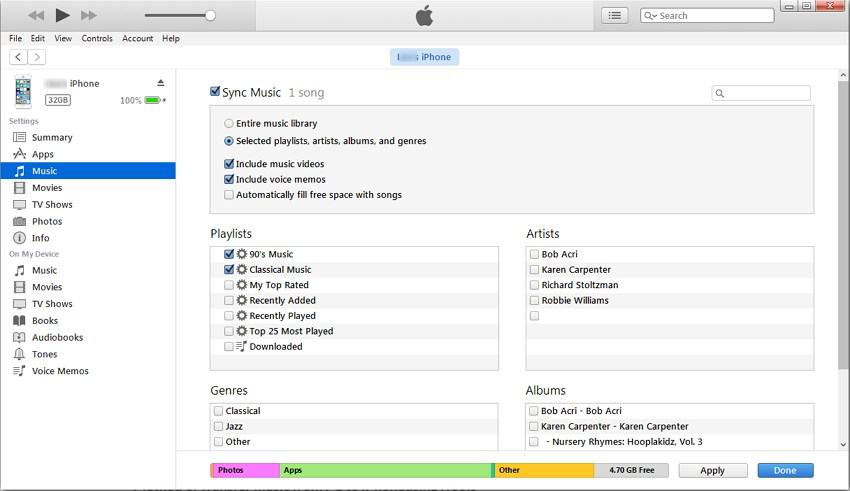
Steps to Sync iTunes Music to iPhone 8/X, Deleting Previous Music
Step 1: Connect iPhone to computer and open iTunes.
Step 2: Click iPhone tab at the top left corner on iTunes. Choose "Music" from the left bar.
Step 3: Check "Sync Music" and select the music you want to transfer to iPhone.
Step 4: Click "Apply" to start syncing the selected songs to your device.
Disadvantages of Using iTunes to Transfer Music
Unfortunately using iTunes to move data between your iPhone and computer is not as simple and straightforward as you may think. This method has a few setbacks and disadvantages which makes TunesMate the best way to transfer your media content. Outlined below are some of the difficulties of using iTunes to sync music.
iTunes is complicated to use and if not, careful you might end up deleting all the old files that you had on your iTunes library prior to the transfer process.
iTunes only supports the transfer of purchased Content from Apple Store and cannot transfer any data from other online stores like Google, Amazon and also freely downloaded files.
With iTunes, you cannot selectively preview files you want to move from your iPhone X/8.
iTunes has so many limitations and restrictions. For instance, it only allows syncing of music up to a maximum of five devices.
iTunes doesn't support to transfer ringtones, apps and PDFs any more.
Sponsor ads:Transfer Calendar from Android to Android
Sponsor ads:6 Best Running Apps For iPhone & Apple Watch to Keep Your Fitness
Sponsor ads:10 Best Game Download Sites for PC & Android
Sponsor ads:
Gihosoft Free iPhone Data Recovery:https://www.gihosoft.com/iphone-data-recovery-free.html
Gihosoft iPhone Data Recovery Free
Free iPhone Data Recovery Software for Windows/Mac
Recover up to 12+ types of files, including contacts, SMS, photos, WhatsApp, Viber, notes, etc.
Restore lost data from iOS devices directly or from iTunes and iCloud backup
Recover iPhone data lost due to iOS upgrade/jailbreak, accidental deletion, device lost or broken
Support all the latest iPhone, iPad and iPod Touch
Both Free and Pro version.
If you lost data after you updated to a new iPhone, you can always use Gihosoft iPhone Data Recovery to get the data back from the old iPhone or backup.You may also like: iphonerecovery.com
If you use android phones, please choose Gihosoft Android Data Recovery.
With Gihosoft Android Data Recovery, no longer afraid of data loss!
Must read:Youtube video downloader for pc
Gihosoft RePicvid Free Photo Recovery Software provides a free photo recovery software for windows to help users recover the deleted or lost photo for free.
Jihosoft Android Data Recovery: the best Android Data Recovery software for Windows and Mac to recover deleted contacts, messages, photos, videos, WhatsApp and etc from Android devices.Tips:How to transfer messages from iPhone to iPhone
jihosoft Free iPhone Data Recovery
Monday, February 25, 2019
How to Sync Notes from iPhone to Mac
1. Sync Notes from iPhone to Mac using iCloud
You can also sync your notes with the help of iCloud. This is another way to get your notes synced on Mac and you can carry them wherever you go. Here are the steps on how to sync notes from iPhone to Mac via iCloud. Please make sure that you have enabled Notes in iCloud settings on your iPhone.
Step 1 – Open you Mac computer and launch "System Preferences" by clicking on Apple icon at the top left corner.
Sponsor ads:Share YouTube Video at Specific Time on Mobile and PCMust Read:If you lost data after you updated to a new iPhone, you can always use Gihosoft iPhone Data Recovery to get the data back from the old iPhone or backup.
Gihosoft Free iPhone Data Recovery:iphonerecovery.com
If you use android phones, please choose Gihosoft Android Data RecoveryStep 2 – Look for the "iCloud" button and click on it.
Step 3 – Now, sign in with your Apple details of ID and password. Enter the details and click on "Sign in" button.
Step 4 – Next, you will need to click the box just beside "Use iCloud for mail, contacts, and calendars, reminders, notes and Safari" followed by clicking on"Next". This way your notes will be synced to Mac.

2. Sync Notes from iPhone to Mac using Email
Using email is another method to get notes from iPhone to Mac. Let us get to know the steps for this method of syncing. Presuming that you have setup an iCloud account on your iPhone already and your "Notes" is allowed to sync in your account settings, follow the steps below for syncing your notes from iPhone to Mac using email.
Step 1 – On your Mac, hit on Apple logo at the top left and click on "System Preferences". Then tap on "Internet Accounts".
Step 2 – From the upcoming list, select your email account provider and sign in to it using your Username and Password.
Step 3 – Lastly, you have to choose the apps you wish to sync between the Mac and your email account. Hit on the checkbox next to "Notes" and tap "Done". That's it, in a while all your notes will be synced to your Mac.
Conclusion
This is all we could get to you to make you understand how to sync notes from iPhone to Mac. Please let us know through the comments below what method you choose to get notes from iPhone to Mac and how it goes.Sponsor ads:Hack Someone’s Cell Phone With Just Their Number
Fix Windows 10/8 100% Disk Usage with 5 Methods 2019
Computer to iPhone Music Transfer without iTunes, but Dropbox 2019
Computer to iPhone Music Transfer without iTunes, but Dropbox
You can use Dropbox the same way you use any other cloud service. It can store files, and therefore it can help you transfer them as a secondary function.
Limits:
Though it supports all music files, keep in mind that you have to convert the music first if it’s not in a format supported by iPhone.
The music transferred is not in Music app but Dropbox app. You need to download another music player app.
To use Dropbox to transfer music, simply do this:
Step 1. Sign into your Dropbox account on your computer.
Step 2. Upload the files that you want to transfer.
Step 3. Go to the Dropbox app on your iPhone.
Step 4. Download the files to your device from Dropbox.

3. Transfer Music from Computer to iPhone by Streaming
With various streaming music services, you can store and download music that you purchase on that specific platform. There are services like this to choose from, like Spotify, SoundCloud, YouTube Red, etc.

Limits:
Of course, the major limitation here is that it costs money. Also, you’ll only be able to transfer music to iPhone when you have an Internet connection.
As well, the music is in the specific app instead of in the Music app.
You can share this music with family or friends.
Here is a simple guide that will work with most of them:
Step 1. Sign up for a streaming service and buy music on there.
Step 2. Download the service’s app onto your phone.
Step 3. Download your purchases through the app.Sponsor ads:Setup Dual Monitors in Windows 10 Computer 2019
Sponsor ads:Recover Deleted Video and Audio Files from Android Phone
Sponsor ads:Free File Recovery Software 2019 for Windows and Mac
4. Copy Music from Computer to iPhone Using MediaMonkey
MediaMonkey is a tool that you can use to transfer your music. Here’s how:
Step 1. Install the MediaMonkey application on your PC.
Step 2. Run the application, then go to File, and then Add/Rescan Tracks to the Library.
Step 3. You will be able to browse for a folder with your music in it. Do this now, and once you have the folder you want, click OK.
Step 4. Plug your iPhone into your PC.
Step 5. Click on the icon for your device. It should now transfer the music that was in the folder you chose to your iPhone.
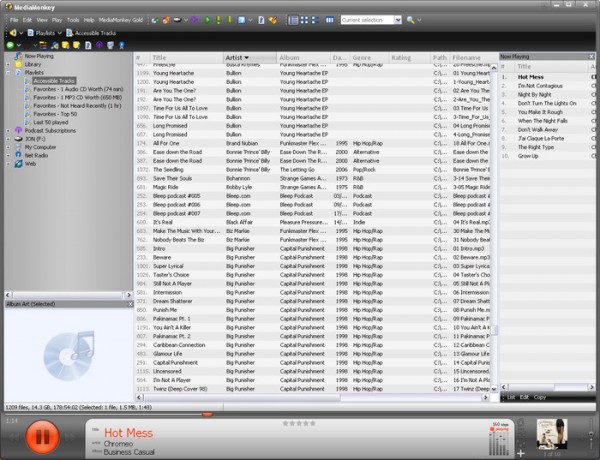
One limitation of this is that it only works for Windows, which can be a problem of course if you have a Mac. Another issue is that it simply doesn’t give you as much control over your files as TunesMate. If you need a device manager, definitely consider TunesMate first—it is versatile and has all of the essential features.
How Do I Delete a Kik Account?
Deleting a Kik account is a huge step. You will no longer be able to receive Kik Messages from your friends and your username will not be searchable. Also, your name will be deleted from your friend’s account. But while the reasons you may want to delete you Kik account are varied, you will be glad to know that it is easy to deactivate the account permanently or temporarily. In this article, we will share with you how to do that.
Temporarily Deactivate Your Account
Temporary deactivation is ideal for when you want to stop using Kik for a while but you will come back to it later. You can reactivate your account by simply signing in to your account. Here’s how to temporarily deactivate your account.
Step 1: Go to https://ws.kik.com/deactivate and enter the email address you used to register your Kik account.
Step 2: You will then receive an email with a link to deactivate your account.

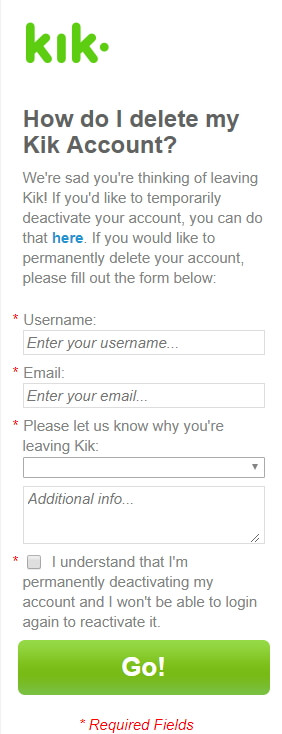
Permanently Deactivate Your Account
Before we show you how to permanently deactivate your account, we feel you should know what will happen when you do this. To begin with, your account will no longer be accessible, you will not be able to receive Kik messages or emails from Kik, your username will not be searchable and your profile will be deleted from the contacts lists of all your friends.
Once your account is permanently deactivated, you will not be able to log back in or access any of your information such as message history or contacts. Here’s how to do it.
Step 1: Go to https://ws.kik.com/delete and enter the correct information as requested on the webpage.
Step 2: You will then receive an email with a link to permanently deactivate your account.
How to Deactivate My Teen’s Account
If you are worried that your teenager may be engaging in untoward behavior on Kik, you may want to deactivate their account. Deactivating their account means that your teen will no longer communicate with their contact list and their account will be deleted from the Kik contact list of all people they have talked to.Sponsor ads:Change Public and Private IP Address on Windows 10/7/8
To do this, you need access to the email address associated with their Kik account. Then simply follow the steps above to either temporarily deactivate their account or permanently delete it.
Or you can submit a deactivation request with your teen's Kik username and their age to the Kik customer support team by sending a email to this address support@kik.com with the subject line ‘Parent Inquiry’.
How to Backup Your Kik Messages on iPhone
Sponsor ads:ISO Mounter Free Software for Creating Virtual CD Drive
Also Read:Download the Latest Version of Samsung Kies for PC and Mac OS
Restore iPhone without iCloud Password 2019
Way 2: Reset iPhone without iCloud Password Directly from iOS Setting
As we have mentioned above, the iCloud password is the same as the Apple ID password. Therefore, we can change iCloud password to a new one in some simple steps. You can try to change your iCloud password before restoring your iPhone without it.
Premise - It works only if you have done an iCloud backup for iphone before.
You can also factory reset your iphone without passcode in settings if you didn’t sync iPhone with iTunes before.
Step 1. On your iphone, go to your Settings
Step 2. Tap General.
Step 3. Tap Reset.
Step 4. Tap where it says “Erase All Content and Settings” And you will be asked to enter your iPhone password, it's the screen lock password, not the iCloud password.
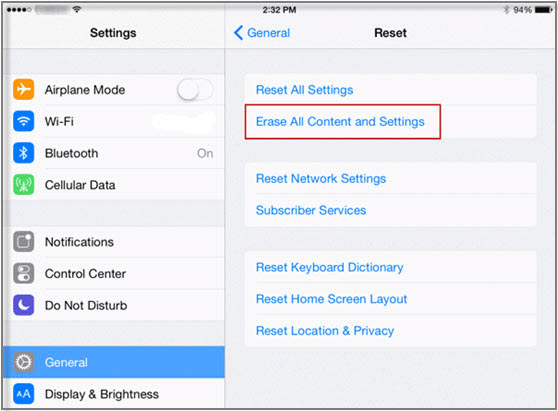
Step 5. Tap “Erase iPhone”.
Step 6. Your iPhone should restart and everything should be like new.
Step 7. When you see the “Set up your iPhone”, click on “Restore from iCloud Backup”. Then choose backup and let it set up your iPhone.Sponsor ads:ISO Mounter Free Software for Creating Virtual CD Drive
Also Read:Download the Latest Version of Samsung Kies for PC and Mac OS
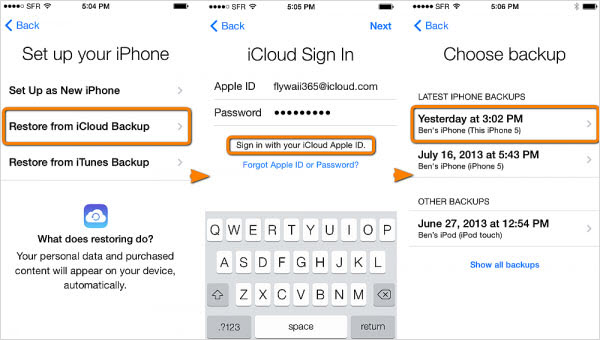
Please note, this method won’t work unless you have Find My iPhone enabled, since this is how the phone will verify who you are when you restore a backup on it.
Way 3: Restore iPhone without iCloud Password Using iTunes
Premise - It works only if you have synced your iphone to iTunes before.
The first way to factory reset iphone without password is to use iTunes.
Step 1. Before anything else, back up your iphone. You never know what can go wrong, so it’s important to always have a recent backup on hand to restore from. This is especially important if you plan on putting any of your data back on your iPhone, of course.
Step 2. Open iTunes after plugging your iphone into your computer.
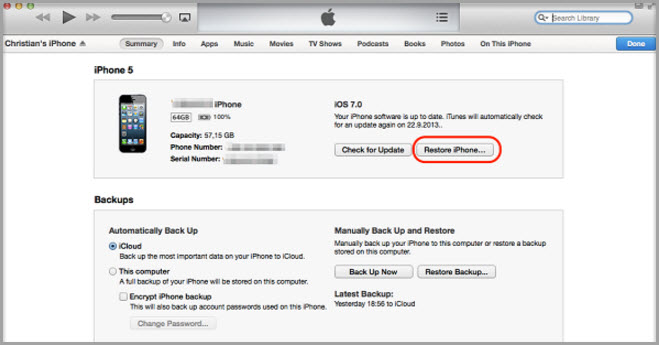
Step 3. Click on your device and go to the Summary page for it on iTunes.
Step 4. Click Restore iPhone.
Step 5. When the dialog box pops up asking you if you’re sure, click Restore again.
Step 6. When the software update comes up, click Next.
Step 7. You will now see a software license agreement. Click where it says Agree.
Now you simply wait for iTunes to restore your iPhone.
Reset/Change Your iCloud Password
Way 1: Set A New iCloud Password
Apple Inc. is very good with the security on their iPhones, and this is usually one of their top priority. iCloud being one of their services is impossible to access without keying in the right password, and the data backed therein is as good as lost.
However, all is not lost you can opt to reset or restore your iCloud password. The iCloud password is the same as the Apple ID password and resetting one is the same as resetting the other. Here are the steps of recovering iCloud password:
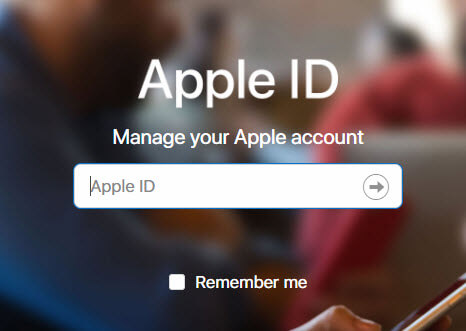
Step 1. Open your apple id account page and click “Forgot Apple ID or password.”
Step 2. Enter your Apple ID.Sponsor ads:Add Animated Text to GIF with or without Photoshop
Also Read:Download the Latest Version of Samsung Kies for PC and Mac OS

Step 3. Choose the option to reset your password and then click “Continue.”
Step 4. Then you will be prompted to choose the method that you use to reset your password including to answer the security questions, get an email, use the two-factor authentication or the two-factor verification.
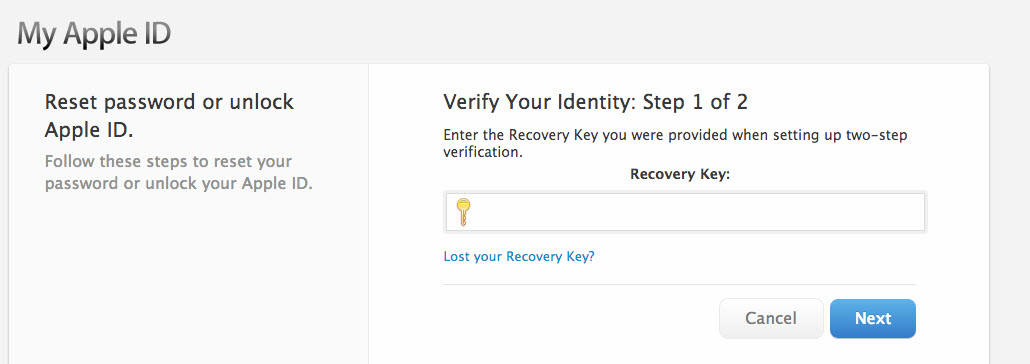
Step 5. If you choose either, then you will be directed to a Reset password page which you will use to change to a new password of your choice.
Once you have a new password, then it becomes possible again to Sign in iCloud with your Apple ID and new password and choose the right iCloud backup file to restore.
Way 2: Change iCloud Password into A New One
As we have mentioned above, the iCloud password is the same as the Apple ID password. Therefore, we can change iCloud password to a new one in some simple steps. You can try to change your iCloud password before restoring your iPhone without it. Following the steps:
Step 1: Go to https://appleid.apple.com/#!&page=signin, input your Apple ID and then sign in.
Step 2: Click “Password and Security”, then you will need to answer your security question.

Step 3: After verifying your identity, click “Change Password”.
Step 4: From the next page, you will need to input two passwords. One is your current password; the other is your new password.
After the password has been changed, you can use the new password with your Apple ID, iCloud and iTunes.Sponsor ads:ISO Mounter Free Software for Creating Virtual CD Drive
Also Read:Download the Latest Version of Samsung Kies for PC and Mac OS
Sunday, February 24, 2019
Move Music from Windows Media Player to iPhone Using iTunes 2019
Move Music from Windows Media Player to iPhone Using iTunes
Step 1. Before what you do, update your iTunes library to the latest version first. Connect your iPhone to computer.
Step 2. On your computer, browse for the music folder for Windows Media Player.
Step 3. Open iTunes, go to File > Add File/Folder to iTunes, browse for the music folder of Windows Media Player.

Step 4. Click on your iPhone tab at the upper-left corner on iTunes. Go to Music category from the left sidebar.
Step 5. Check Sync Music and the hit the Apply button.
Now all the iTunes music will be synced to your iPhone. But note that, the music library on iPhone will be deleted as well. If you never back up, you will lose all your songs.
Why You Should Use iPhone Transfer Instead of iTunes to Transfer Music?
Apps/Metrics
iTunes
iMyFone iPhone Transfer
Sync iTunes Library without Data loss

Sync an iPhone to Different Computers without Erasing

Directly Add Music to iPhone

Extract Files from iPhone

Support Non-Purchased Media
Only Purchases

Selectively transfer Media

Share iTunes Library
Lots of Limits

Extract photos to Computer

Sure, iTunes has a few benefits, but those benefits are heavily outweighed by the downsides. There’s no doubting that iMyFone iPhone Transfer is a much better program.Sponsor ads:Best iOS Emulator For Windows To Build & Run iOS Apps
Must Read:If you lost data after you updated to a new iPhone, you can always use Gihosoft iPhone Data Recovery to get the data back from the old iPhone or backup.
Gihosoft Free iPhone Data Recovery:iphonerecovery.com
If you use android phones, please choose Gihosoft Android Data Recovery
Sponsor ads:emoji font 3 apk
Sponsor ads:Use Remote Desktop Connection in Windows 10
SafeEraser: Wondershare Software Review
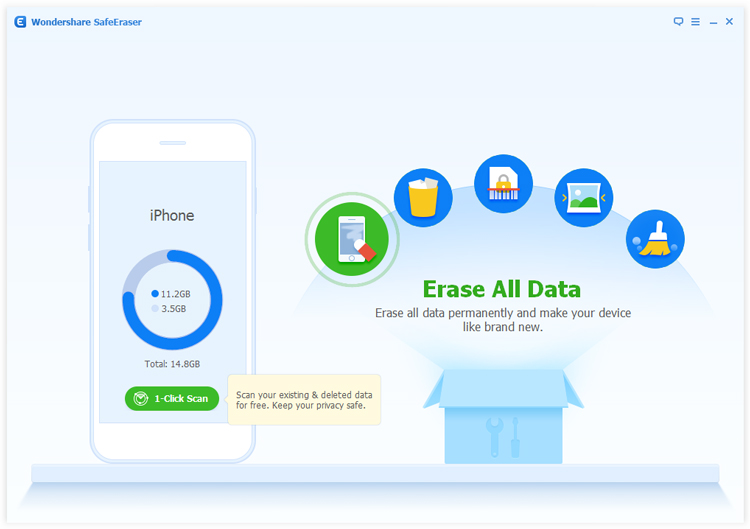
SafeEraser: Wondershare Software Review
Wondershare SafeEraser is data erasing software that allows your to permanently wipe information from your iPhone. This is different from manual deletion because the data is unrecoverable after you use SafeEraser. It has a few interesting features:
Scan and erase private data.
Optimize the space on your device.
Analyze deleted data on your iPhone.
Erase data on your iPhone and make it completely unrecoverable.
Test & Review
SafeEraser is a good data eraser that is comparable to other ones on the market. It wasn't too hard to use, and you simply plug your iPhone into your computer and open up the application. Though the interface wasn't as intuitive as some other software options that we've used, it was adequate and it didn't take long to find everything that you needed.
It was simple enough to erase private data on the phone, either selectively or all at once. There were also a few extra security measures to keep you from deleting your data accidentally. Overall, it seemed good at permanently deleting the data on your iPhone, which is its main function.

Cons
Not the greatest interface. It was okay, but our preference is for a simpler interface where all of the functions are clearly labeled. The labels for some of the functions on SafeEraser don't come up unless you click on their corresponding icons, which is slightly annoying. This is commonly called “mystery meat navigation” in the UX world. To be fair, the unlabeled icons aren't that hard to figure out, though.
It doesn’t support to erase data of third-party apps.
It costs money. There is a free trial, but after that, it costs $29.99.
Sponsor ads:how to remove cydia
Must Read:If you lost data after you updated to a new iPhone, you can always use Gihosoft iPhone Data Recovery to get the data back from the old iPhone or backup.
Gihosoft Free iPhone Data Recovery:iphonerecovery.com
If you use android phones, please choose Gihosoft Android Data Recovery
Things to Do Before Selling Old iPhone, After Upgrading to iPhone X/8/8 Plus 2019
What to Do Before Selling Your Old iPhone, After Updating to iPhone X/8/8 Plus
The process for clearing your iPhone is different depending on whether you still physically have your old iPhone or not. Here are the different methods.
Case 1: If You Still Have Your Old iPhone
Case 2: If You No Longer Have the Old iPhone
Case 1: If You Still Have Your Old iPhone
1. Back up Your iPhone
The first thing that you should do before anything else is backing up your data so that you can alter transfer it to the new iPhone X/8/8 Plus. You can do this by simply using iTunes or iCloud.
iTunes backup: Connect iPhone to PC and open iTunes > Click on device tab > Click on “Back Up Now”.
iCloud backup: Go to “Settings > iCloud > Photos” on iPhone to turn on “iCloudPhoto Library”. Go to “Settings > iCloud > turn on iCloud Backup” and click on “Back Up Now” to back up the whole things.

2. Turn off or Sign out of Your Services
Next, you’re going to need to sign out of all of your services.
✓ Turn off iMessage: Head to Settings > Messages > iMessages and turn it off.
✓ Turn off FaceTime: Go to Settings > FaceTime and turn it off.
✓ Turn off Activation Lock: Open Settings > iCloud > Find My iPhone and disable it.
✓ Sigh out of iCloud: Head to Settings > iCloud and sign it out.
✓ Sign out of iTunes & App Store: Open Settings > iTunes & App Store > Apple ID > Sign out.
✓ Unpair Apple Watch: Go to Apple Watch app on iPhone when Apple Watch is nearby > Find My Watch and choose your watch > Click on Info icon next to the watch > Tap Unpair Apple Watch. (A backup of your Watch will be created to restore if you pair it with new iPhone.)

3. Reset Your iPhone to Factory Settings
Finally, you will want to reset your iPhone to factory settings. You can do the usual restore using iTunes to restore your iPhone, but the problem with this is that your data is still recoverable by special hacking tools.Sponsor ads:
Gihosoft Free iPhone Data Recovery:https://www.gihosoft.com/iphone-data-recovery-free.html
Gihosoft iPhone Data Recovery Free
Free iPhone Data Recovery Software for Windows/Mac
Recover up to 12+ types of files, including contacts, SMS, photos, WhatsApp, Viber, notes, etc.
Restore lost data from iOS devices directly or from iTunes and iCloud backup
Recover iPhone data lost due to iOS upgrade/jailbreak, accidental deletion, device lost or broken
Support all the latest iPhone, iPad and iPod Touch
Both Free and Pro version.
If you lost data after you updated to a new iPhone, you can always use Gihosoft iPhone Data Recovery to get the data back from the old iPhone or backup.You may also like: iphonerecovery.com
If you use android phones, please choose Gihosoft Android Data Recovery.
With Gihosoft Android Data Recovery, no longer afraid of data loss!
Must read:Youtube video downloader for pc
Gihosoft RePicvid Free Photo Recovery Software provides a free photo recovery software for windows to help users recover the deleted or lost photo for free.
Jihosoft Android Data Recovery: the best Android Data Recovery software for Windows and Mac to recover deleted contacts, messages, photos, videos, WhatsApp and etc from Android devices.Tips:How to transfer messages from iPhone to iPhone
jihosoft Free iPhone Data Recovery
Thursday, February 21, 2019
iPhone Can’t Charge? Here Are the Tips 2019
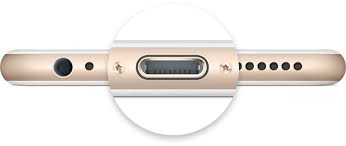
1 Check iPhone's Charging Port
Sometimes, the problems are not as terrible as we begin assuming. They just have simple solutions. If your iPhone can't charge, you simply need to scrutinize the iPhone's charging port. See if it is blocked or not. You may not believe but a tiny amount of lint from the cloth can be responsible for the issue. We all keep our phones in our pockets, no surprise the charging port can easily get trapped by a little (or maybe more than that) amount of lint stopping the iPhone to get charge eventually. Moreover, debris, gunk or any sort of dust particles can be responsible for the same as well. Therefore, check the iPhone's charging port and if you find any kind of dust particle; don't delay to clean it up. You can use a paper clip or tweezers or even toothbrush for doing so. After that, check if your iPhone is charging or not.
2 Check Charger and USB Cable
Are you charging your device with non-Apple cable or a charger? If yes, then this can be a reason for hindrance in charging your iPhone. So, if iPhone can't charge, please avoid the use of cheap iPhone chargers and check with original ones. Original chargers are no doubt, expensive but to prevent the charging issue, add some more bucks to your budget and convert the low-quality chargers to good ones.

3 Change Power Sources
Still, if you find your iPhone can't charge you should check the power source in which you've plugged in your charger. Try changing the power sources like other wall power outlet or try plugging your data cable into your computer or laptop to check if your iPhone takes on any charge or not. Try plugging your data cable into your docking station to check if your iPhone still can't charge or not.
Soon as your iPhone takes up any charge, a lightning bolt will appear next to your battery icon, visible in the status bar of your device.
4 Check Software Issues
Another easiest tip you can try when your iPhone can't charge, is forcing it to restart. Keep pressing the "Sleep/Wake" button. Along with it, press "Home" button if you possess iPhone 6 or earlier or "Volume Down" if you have iPhone 7. Hold as it is for approximately 10 seconds until you see Apple logo.
1 Restore iPhone
If the problem is still not fixed, attempt for restoring with iTunes. Here is a quick step-by-step guide to hard reset your iPhone with iTunes.
Launch iTunes on your computer and plug in your iPhone to it.
You then need to click on iPhone button after iTunes detects your phone.
You are then required to look under the tab named as "Summary" and hit on "Restore iPhone".
A pop-up message will appear prompting you to make a backup of your device or if you have it backed up already, hit "Restore", this will initiate the process of wiping all the data and restoring your iPhone settings to its factory state.
On successful completion of the process, your iPhone device will start and show up "Slide to Setup screen". You'll be good to go then, and may eventually solve you iPhone can't charge issue.

2 Fix iPhone Can't Charge Problem without Data Loss Sponsor ads:
Gihosoft Free iPhone Data Recovery:https://www.gihosoft.com/iphone-data-recovery-free.html
Gihosoft iPhone Data Recovery Free
Free iPhone Data Recovery Software for Windows/Mac
Recover up to 12+ types of files, including contacts, SMS, photos, WhatsApp, Viber, notes, etc.
Restore lost data from iOS devices directly or from iTunes and iCloud backup
Recover iPhone data lost due to iOS upgrade/jailbreak, accidental deletion, device lost or broken
Support all the latest iPhone, iPad and iPod Touch
Both Free and Pro version.
If you lost data after you updated to a new iPhone, you can always use Gihosoft iPhone Data Recovery to get the data back from the old iPhone or backup.You may also like: iphonerecovery.com
If you use android phones, please choose Gihosoft Android Data Recovery.
With Gihosoft Android Data Recovery, no longer afraid of data loss!
Must read:Youtube video downloader for pc
Gihosoft RePicvid Free Photo Recovery Software provides a free photo recovery software for windows to help users recover the deleted or lost photo for free.
Jihosoft Android Data Recovery: the best Android Data Recovery software for Windows and Mac to recover deleted contacts, messages, photos, videos, WhatsApp and etc from Android devices.Tips:How to transfer messages from iPhone to iPhone
jihosoft Free iPhone Data Recovery
Subscribe to:
Posts (Atom)