Generally, backing up your iTunes library to your computer or to an iDevice is very crucial and highly recommended. However, having a backup on an external hard drive gives you an added advantage in an event of a computer or phone crash. To successfully achieve this, you’ll want to ensure the external hard drive has sufficient space for a complete backup. Once that is done, you can proceed with the following steps:
1. Look for the iTunes Media Folder
Before progressing with the backup, you’ll have to locate the iTunes media folder on your computer. Follow the simple steps below to do that:
For Mac: Go to Finder and then choose your username, hit iTunes
For Windows:
Windows Vista or later: Users >> username >> Music
Windows XP: Documents and Settings >> Username >> My Documents >> My Music
If you followed the paths as described above and you still weren’t able to locate your iTunes media folder, this guide will show you how to go about it:
Launch iTunes application.
Click on the "Edit >> Preference" window to open.
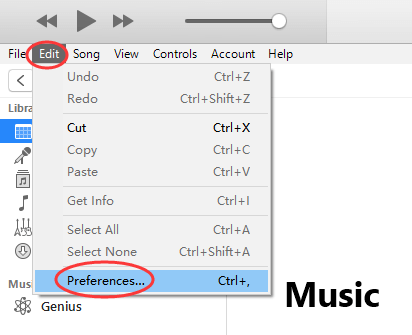
Hit the "Advanced" tab.
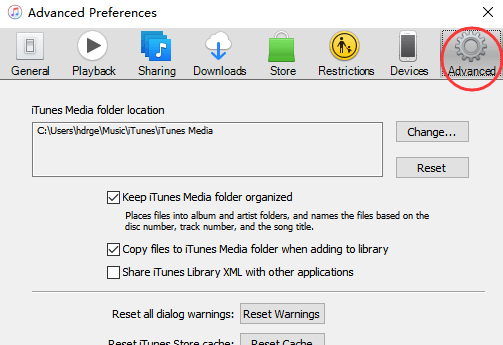
The box below the iTunes Media folder location shows the location of your iTunes media folder on your computer.

2. Consolidate iTunes Library
Now that you have successfully found the location of your iTunes media folder, the next thing would be to consolidate your iTunes library. Consolidating your iTunes library means making sure all of your iTunes files including your music, videos, etc. are in one place. Take the steps below to consolidate your iTunes library:
Launch iTunes application.
Tap the "File menu >> Library >> Organize Library".

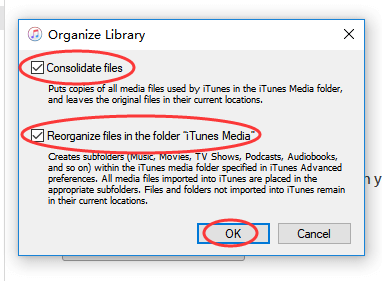
A window pops up, choose "Consolidate files". This will move every used file in your iTunes library to one location.
Next to Reorganize files in the folder "iTunes Media" is a box, check the box. If you have your files organized into subfolders already for Music, TV shows, podcasts, audiobooks, movies, etc. the box will be greyed out and not clickable.
Sponsor ads:Best 5 Android Apps to Change Photo Backgrounds
Sponsor ads:How to Unblock Blocked Websites with 5 Methods 2019
Sponsor ads:HTC Sync Manager Review
Sponsor ads:How to Delete Embarrassing Word Suggestions from Android KeyboardSponsor ads:What is iTunes Helper & How to Disable it from Windows/Mac PC
Hit "OK" to consolidate and organize your iTunes library.Sponsor ads:
Gihosoft Free iPhone Data Recovery:https://www.gihosoft.com/iphone-data-recovery-free.html
Gihosoft iPhone Data Recovery Free
Free iPhone Data Recovery Software for Windows/Mac
Recover up to 12+ types of files, including contacts, SMS, photos, WhatsApp, Viber, notes, etc.
Restore lost data from iOS devices directly or from iTunes and iCloud backup
Recover iPhone data lost due to iOS upgrade/jailbreak, accidental deletion, device lost or broken
Support all the latest iPhone, iPad and iPod Touch
Both Free and Pro version.
If you lost data after you updated to a new iPhone, you can always use Gihosoft iPhone Data Recovery to get the data back from the old iPhone or backup.You may also like: iphonerecovery.com
If you use android phones, please choose Gihosoft Android Data Recovery.
With Gihosoft Android Data Recovery, no longer afraid of data loss!
Must read:Youtube video downloader for pc
Gihosoft RePicvid Free Photo Recovery Software provides a free photo recovery software for windows to help users recover the deleted or lost photo for free.
Jihosoft Android Data Recovery: the best Android Data Recovery software for Windows and Mac to recover deleted contacts, messages, photos, videos, WhatsApp and etc from Android devices.Tips:How to transfer messages from iPhone to iPhone
jihosoft Free iPhone Data Recovery
Note: Rather than moving the files, consolidating files will actually create duplicate files. To save space you might want to delete the duplicates.
3. Save iTunes Library to External Hard Drive
You found your iTunes media folder, consolidated your iTunes library, now it’s time for the backup.
Exit iTunes application
Connect your external hard drive to the computer and browse your computer to find it.
Look for a folder called “iTunes Media”. You’ll find this in the path we followed earlier.

When you locate the folder, click and drag it to the external hard drive. This will copy your iTunes library to the hard drive.
Once the transfer is successful, you’ll now have your iTunes library backed up in your external hard drive.
Disconnect the external hard drive.
Also Read:How to Delete Embarrassing Word Suggestions from Android Keyboard
Also Read:5 Best Video to MP3 Converter to Extract Audio from Video Files
We have looked at how to save iTunes library to iPhone using an awesome transfer tool called iMyFone TunesMate and also how to save iTunes library to an external hard drive. No doubt there are lots of iOS users that are not aware they can easily backup their entire iTunes library. We are glad you read this article today and we want you to create a backup today, it’s easy and can be done in just a few minutes.
No comments:
Post a Comment