Wednesday, December 5, 2018

2019 Fix iPhone Notes Not Syncing


Fix iPhone Notes Not Syncing 2019

Syncing your notes is necessary if you use multiple devices. You do not have to be fastidious about the device you make your notes on because you can easily access the notes across all your devices.

However, some users complain of iPhone notes not syncing. If you are one of such users, you should know that there could be different reasons why your notes aren’t syncing between iPhone and mac. This guide will list some common the possible causes and simple steps you can take to find a solution.
Why are My iPhone Notes Not Syncing?

There are various reasons why your notes aren’t syncing between iPhone and mac or other Apple devices. Here are some of them:


You’re storing your notes locally: before you cry wolf about iPhone notes not syncing, you should confirm you’re not the cause of the problem. If the ‘on my iPhone’ feature is enabled, you are instructing the device to store your notes locally.


Multiple iCloud accounts for different devices: Your notes not syncing between iPhone and mac could be because you’re using different iCloud accounts on these devices.


iOS is not updated: outdated iOS versions is another common reason why your notes may not sync between your iPhone and iPad or other Apple devices.


Syncing via iCloud is disabled: Your Apple devices are capable of syncing more than just notes. When you go to your iCloud settings, you’d see all the features you can sync with iCloud. If ‘Notes’ is not one of the ticked features, you’d have the problem of iPhone notes not syncing.


How to Solve iPhone Notes Not Syncing
Now that you know the possible causes of your iPhone notes not syncing, we will explore the solutions for this problem. Just follow these easy steps anytime you observe that your notes aren’t syncing between iPhone and mac or other devices. You can rest assured that the steps highlighted in this article are effective and easy to follow.
1. Confirm you have logged in the same iCloud account

The moment you observe your notes aren’t syncing between iPhone and mac, you should confirm the two devices aren’t signed into different iCloud accounts.

Step 1: Go to ‘settings’ on your iPhone.

Step 2: Tap iCloud or your name and confirm the credentials you used to log in. If you are not logged in at all, you should set up and iCloud account and login with your Apple ID and password.
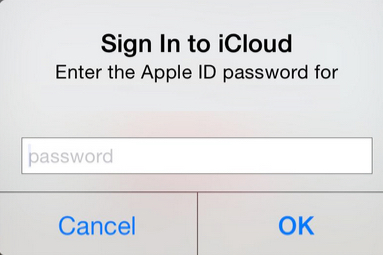


To log in to iCloud on your mac, go to ‘System Preferences’ and you’ll see the iCloud option. If you are using a Windows computer, you would need to install iCloud for Windows before anything else.
2. Confirm the notes aren't stored locally on iPhone

When you store your notes locally on your iPhone, you are telling your device you do not wish to sync your notes with iCloud. You would need to disable this setting before your iPhone notes not syncing problem can be solved.Sponsor ads:
Jihosoft  iPhone Data Recovery

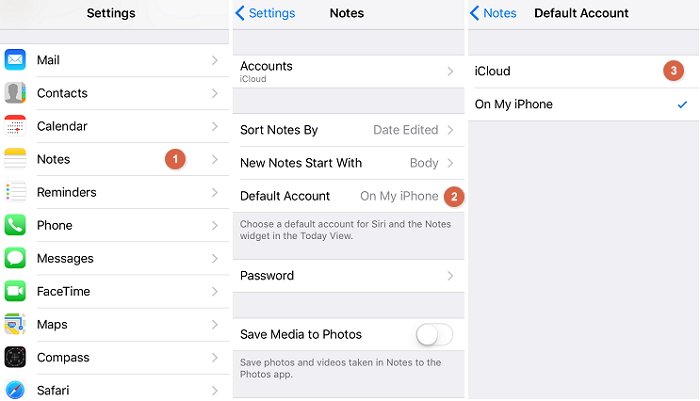
Step 1: Go to ‘Settings’ and tap ‘Notes’.

Step 2: Tap ‘Default account’ .

Step 3: Select the ‘iCloud’ option. Once you select the iCloud option, your notes would be stored on your iCloud and the notes can now sync across your devices.

3. Confirm you have enabled Notes settings

If you do not enable Notes settings on your iCloud, your notes would not sync across your Apple devices. You can follow the steps below to enable ‘Notes’ settings:

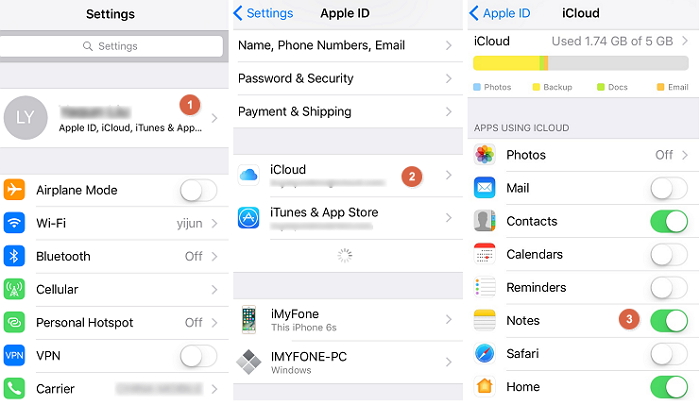
Step 1: Go to ‘Settings’.

Step 2: Tap on your ‘Apple ID’. You should see this at the top of your screen.

Step 3: You’ll see ‘Notes’ among the other options. Toggle on the ‘Notes’ button to enable syncing.

4. Sign out iCloud and back in again

This serves to refresh your iCloud account. You can follow the steps below to sign out your iCloud account and back in again.

Step 1: Go to ‘Settings’.

Step 2: Tap your name at the top of the screen.

Step 3: Tap the sign out at the bottom of the screen.

Step 4: Enter your Apple ID and Password to sign in again.


This procedure works if your device runs on iOS 10.3 or later. If you're using earlier iOS versions, you’ll tap ‘iCloud’ and then ‘Apple ID’ before you’ll see the sign out option.
5. Restart your iPhone and iPad or Mac

Restarting is a safe method of troubleshooting whatever issue you are experiencing with your iPhone. You should explore this option whenever you observe that your iPhone notes are not syncing especially when you are sure the problem just came up. If the problem you are experiencing is as a result of a conflict between software on mac or iPhone, restarting would help you solve the problem.

Step 1: Long press the sleep/wake button on your iPhone until you see a red slider on your screen.

Step 2: Drag the red slider to switch off the phone.

Step 3: Wait for about 30 seconds. The phone must have shut down while you are waiting.

Step 4: Long press the sleep/wake button on your iPhone and watch as the phone reboots.

If you are using an iPhone X, the slider would only show up when you press and hold the side button together with any of the volume buttons. Once the slider appears, you can follow the same steps listed above.


If you want to restart your mac, you’ll see the menu button on the upper left corner of your device’s screen. Click on it and select the restart option when the menu pops up. Then a prompt will ask you to confirm restart. Your mac would restart after confirming.

Sponsor ads:

Gihosoft Free iPhone Data Recovery:https://www.gihosoft.com/iphone-data-recovery-free.html

Gihosoft iPhone Data Recovery Free

Free iPhone Data Recovery Software for Windows/Mac

Recover up to 12+ types of files, including contacts, SMS, photos, WhatsApp, Viber, notes, etc.

Restore lost data from iOS devices directly or from iTunes and iCloud backup

Recover iPhone data lost due to iOS upgrade/jailbreak, accidental deletion, device lost or broken

Support all the latest iPhone, iPad and iPod Touch

Both Free and Pro version.

If you lost data after you updated to a new iPhone, you can always use Gihosoft iPhone Data Recovery to get the data back from the old iPhone or backup.You may also like: iphonerecovery.com

If you use android phones, please choose Gihosoft Android Data Recovery.

With Gihosoft Android Data Recovery, no longer afraid of data loss!

jihosoft Free iPhone Data Recovery

Worth reading:Best youtube downloader online download youtube 1080p


Tuesday, December 4, 2018

How to Fix iTunes Error 4280

Image result for iTunes Error 4280


When Will the iTunes Error 4280 Occur?


iTunes Error 4280 sometimes occurs when you are trying to burn a CD via iTunes. The error can be very persistent and therefore quite annoying as it tends to appear every time you try to restart and burn a CD. Fortunately, there are some solutions available that you can try in order to solve the problem.
The Main Causes of iTunes Error 4280
There could be a number of causes behind this error. Mostly, it occurs due to the wrong speed of burning in iTunes. However, it could also be incompatibility of the CD burner and your computer.
Following are the main causes of the error:

Corrupted download or incomplete installation of iTunes.

Drivers have been corrupted or there are invalid entries (iTunes-related) in the registry.

Virus/malware attack has corrupted or damaged iTunes-related program files or Windows system files.

Mistakenly or maliciously deleted iTunes-related files.

Improper or failed uninstallation of iTunes can also lead to this issue.

Solutions for iTunes Error 4280

Following are some other helpful solutions:
1. Update iTunes

One of the first things you should do when you face error 4280 is update iTunes. iTunes updates bring bug fixes that are often sufficient to fix various errors. Updating iTunes is very easy and does not take a lot of time, that’s why it is recommended that you update the software as it might solve your problem and save you a lot of time and hassle looking for other solutions.

Follow these instructions to update iTunes:

Step 1: Open iTunes on your PC.

Step 2: Now click Help and then click on Check for Updates option.

Step 3: If an update is available, follow the on-screen instructions to update the software.
2. Edit the gcdrtype.cfg File

If you are using a CD drive manufactured by Sony and facing error 4280, then there is a specific solution to fix this. You will need to make a small change in a configuration file to fix the error.

Follow these instructions:

Step 1: First you need to find out whether you have a Sony CD drive. To do this, launch iTunes and navigate to Help > Run CD Diagnostics.

Step 2: Now put an audio CD in the optical drive of your computer and click OK.

Step 3: After that, look for this text: IDE\CdRomSONY_CDRW/DVD_CRX830E. You have a Sony CD drive if this text is shown.

Step 4: Now close iTunes and navigate to Program Files\iTunes\CD Configuration and find the gcdrtype.cfg file.

Step 5: Right-click on that file and click Open.

Step 6: Once it is opened in Notepad, scroll to the last section of the text and add | NOSENDOPC at the end of the line that begins with DRVGENERALFLAGS. Click Save afterwards. The error should be fixed now.
3. Reinstall iTunes

If none of the above-mentioned solutions work, then it is recommended that you uninstall iTunes completely and then reinstall it.

Follow these instructions:

Step 1: Quit iTunes and open Control Panel. Then navigate to Program > Program and Features.

Step 2: Now uninstall iTunes as well as its related components.

Step 3: Next, download the latest version of iTunes and install it by following the on-screen instructions.


Sponsor ads:

Gihosoft Free iPhone Data Recovery:https://www.gihosoft.com/iphone-data-recovery-free.html

Gihosoft iPhone Data Recovery Free

Free iPhone Data Recovery Software for Windows/Mac

Recover up to 12+ types of files, including contacts, SMS, photos, WhatsApp, Viber, notes, etc.

Restore lost data from iOS devices directly or from iTunes and iCloud backup

Recover iPhone data lost due to iOS upgrade/jailbreak, accidental deletion, device lost or broken

Support all the latest iPhone, iPad and iPod Touch

Both Free and Pro version.

If you lost data after you updated to a new iPhone, you can always use Gihosoft iPhone Data Recovery to get the data back from the old iPhone or backup.You may also like: iphonerecovery.com

If you use android phones, please choose Gihosoft Android Data Recovery.

With Gihosoft Android Data Recovery, no longer afraid of data loss!

jihosoft Free iPhone Data Recovery


Worth reading:Best youtube downloader online download youtube 1080p

Monday, August 20, 2018

How To Find Someone on Instagram?


Are you desperately searching for how to find someone on Instagram? You can do the same in many ways. But you may not know even a single method provided you are a new user or haven’t used Instagram for a long time. That’s why I have crafted this guide to help you find people on Instagram. Don’t worry! It will not take one heck of your time. Moreover, the process is very easy to follow. Recently, we have also shared step by step tutorial on how you can send direct message on Instagram.


See Also: How to Save Instagram Photos and Videos on Android Phones

How to Find Someone on Instagram?


I have found out a number of ways to find people on Instagram. You can read them below.

1. How to Find Someone on Instagram for PC?

You know Instagram is a mobile application, don’t you? Even though you can sign into your account using Instagram for PC, they won’t give you all the features you get on the mobile application. Apparently, the search field is one such app-only feature.

Still, you get two ways to find a person on Instagram for PC. Find out both below.

How to Find Someone on Instagram for PC with Username?

The process is fairly simple and you won’t be having any doubts regarding this, I swear.

Open your web browser. Then, enter instagram.com/username into the address bar. Don’t forget to replace the username with the exact one.

Boom! Can’t you see your friends profile there?

Find Your Friends on Instagram using Web Applications

There are many web apps for Instagram to help you access all the features. You are going to read how to find someone on Instagram with the help of web applications.

Step 1: Open your web browser and, enter the address of the Instagram web app you use (gramfeed.com or web.stagram.com or anything).

Step 2: Use the Sign in with Instagram button there. You will be asked to authorize the web app on Instargam. Don’t hesitate to do the same.

Step 3: Unlike on the in-house web version, you will get a search field here. Enter the name of your friend into the field.

There you go! You will get the profile of him/her right away.

You may also like – Best Instagram Captions

2. How to Find Someone on Instagram Mobile Application?

Maybe you use the app only. So here in this section, you will find out the method to find people on the application.

Step 1: Pick up your phone and open Instagram application. Don’t forget to login with proper credentials in case you aren’t done the process already.

Step 2: Once you are on the interface, you can see a search field on the bottom. Just tap on the same to initiate the finding process.


Step 3: Tapping on the search field will give you four different options; top, people, tags and places. As we are looking for a person here, you have to choose the second one.


Step 4: Then, type the name of the person on the given field. If you know his/ her username, you should enter the same because usernames are unique on Instagram whereas a name can be taken by multiple people.


Boom! Provided you enter the username or name without any typos, you will get the profile right away.

Do you know how to find someone on Instagram by email? Or maybe you are looking for a way to find a person at Instagram with phone number or social media. Whatever it is, you can follow the method I am going to give next.

Also Read:- How to Manage Multiple Instagram Accounts in Mobile

Another Way to Find Someone on Facebook using the Application

Step 1: Open the app and sign into your account using the correct credentials.

Step 2: Go to your profile by clicking on the doll icon on the top-right portion of the screen. Once you reach your profile, click on the three dots given on the top-right corner.


Step 3: The first few options will aid you in finding people from your contacts or Facebook friend list. In order to find someone by their email, you must save their ID in your contacts.


Also Read:- Easy Steps to Hack School WiFi (Tutorial)

3. How to Find Someone on Instagram with Just a Picture?

What if you don’t have a name, username or anything but a picture of an Instagram profile? How will you find the owner then?

Well, let’s just find out the same.

Step 1: Open your browser and enter tineye.com into the address bar or click here.


Step 2: When you reach the website, you will see a field there. If you don’t have the image file on your hard disk and you know the URL, just insert the same (URL) on the given field there. Then, press Enter.You may also like:online youtube downloader

That’s it. Tineye will find the sources of the images for you. If you are fortunate enough, you can find any page from Instagram there.You may also like:

Gihosoft Total Video Converter is a professional all-in-one video tool that enables you to convert videos and audios into various different formats. You can also download videos from YouTube or other online video sharing sites and convert them easily. Plus, you’re able to personalize your videos with its inbuilt editor, such as, trimming, cropping, applying video effects, adding watermark, subtitles, and more. If you need a powerful and professional desktop video converter program, just download Total Video Converter and follow the step-by-step guide here to have a try.

4. How to Find if Someone Blocked You on Instagram?

You think someone has blocked you. Here we are going to find out whether a person has blocked you or not. Officially, you won’t get any notification about the blockage.

Step 1: Use the #2 method to find out the profile of the person whom you think blocked you. Are you lazy to go back? Then open the app, tap on the search button, choose people and enter the name.You may also like:online youtube downloader

Step 2: Once you find the profile, tap on the same to enter. In case you have been blocked by that person, you won’t be able to see his/her photos.You may also like:how to use move to ios

Can’t you find the profile? Chances are the person maintains a private profile.

Wrapping Up

I have given you about half a dozen ways to search for someone on Instagram.

Hope you won’t search for how to find someone on Instagram anymore.

Do you have any doubt regarding this topic? You can reach out to me using the comment section down below. I will be more than glad to help you out.

Do your social media friends are Instagram buffs? Don’t forget to share this article with them then. They will thank you later.

Related Articles:

How to Find or Track a Lost or Stolen Android Phone Quickly

How to Restore Deleted WhatsApp Messages on Android

How to Retrieve Deleted Facebook Messenger Messages from Android

How to Download Youtube Videos on Android Phone Directly


Wednesday, August 15, 2018

How to Extract Purchased Ringtones from iPhone


How to Extract Purchased Ringtones from iPhone

Naturally, your first plan of action would be to investigate whether or not iTunes can properly handle this. The short answer is “yes”, but not without its complications and limitations.

Step 1: Make sure the computer that you’re using has been properly authorized to play your iTunes Store purchases. You can grant authorization to your computer by going to “Account > Authorizations > Authorize This Computer” on your iTunes and click “Authorize”.


Step 2: Using your iPhone USB charging adapter, connect your device to your computer through a free USB port.

Step 3: Once your device has been recognized by iTunes, go to “File > Devices > Transfer Purchases from [your device]”.Jihosoft Giveaway Alert:

iPhone Backup Extractor - Extract Data from iPhone Backup

The best iPhone Backup Extractor software to extract photos, text messages, contacts, voice memos, note, WhatsApp, Viber and etc from iPhone/iPad backup.

Must Read:Jihosoft iTunes Backup Unlocker

Jihosoft Android Data Recovery: the best Android Data Recovery software for Windows and Mac to recover deleted contacts, messages, photos, videos, WhatsApp and etc from Android devices.

If you can’t sync with iTunes and want to rescue data from a disable iPhone, you could try Gihosoft iPhone Data Recovery. Also feel free to ask questions on the iDevice is disabled error in the comments section below.


This will help you to extract all the purchased files from iPhone to your iTunes library, including music, movies, audiobooks, TV shows, ringtones and more.

Disadvantages of Using iTunes:

iTunes will only support tones that were purchased through the official iTunes Store. This severely limits your freedom when it comes to tones that you created yourself or customized from a purchased source.

Furthermore, there has been various reports of bugs and critical errors within iTunes that has resulted in major data loss and unwanted erasures.

You can’t selectively extract only the specific ringtones from iPhone.

Transferring all the purchased files from iPhone may cause lots of duplicate files on your iTunes library.

Friday, July 13, 2018

How to Delete Pre-Installed Apps on Android 2018

Method 1: How to Uninstall Preinstalled Apps on Android Without Root
DISABLE BLOATWARE


Since Android 4.0 came out, phones have a built in option that allows them to disable bloatware from working in the background and making your phone slow. Unfortunately, there’s no way you can uninstall preinstalled apps without rooting your android phone. However, you can disable them though.


Simply go to your Settings Apps>Applications>Choose the App>Click on Disable


As you can see, this section will provide you the list of apps you have that are stored on your mobile device. By tapping on one of them you can delete them from your mobile phone or disable them from running in the background.


You can do that with the ones that you have downloaded, however, there are even some built in apps that your system allows you to download.


The ones that cannot be deleted can most probably be disabled. I say “most probably” because your phone comes with apps that are essential for it to work smoothly.


So, the safest thing to do is to disable the ones that you don’t need and that your phone is allowing you to. You can also uninstall their updates and save up some more memory in the process.
Method 1: How to Uninstall Preinstalled Apps on Rooted Android PHone
DELETE PREINSTALLED BLOATWARE


So, you may get pretty angry when you want to delete the software so bad but your phone allows you only to disable it. However, there still is a way. This way will recover more from you than usual!


First of all, your phone has to be rooted. What this means is that you need to gain full control over your Android device by “hacking” into it with other software. I say “hacking” because it isn’t really legal to root your device as it is protected by the warranty. However, if you are not afraid to do so (and many people have done it so far) then this is the first step you need to take.


Here is your solution: System App Remover (ROOT).


This is an app you can find on Google Play. What it does is exactly what you need. If your phone is rooted, download the app. The app runes smoothly and it is pretty straightforward to use. But before you can use it you should root your phone first.
No Apps Needed


Literally all you need to do is run the app and find other apps that you want to download from your phone. After you have selected them just tap “Uninstall” and your app will be gone from your phone!
Also Read:7 Best Free Parental Control Apps for Android to Keep Your Kids Safe
Also Read:How to Transfer Data from iPhone to iPhone X/8/8 Plus
Also Read:8 Best To-do List Apps for Your iOS Device to Make Your Work Done
That’s all that you need to do!


THE FINAL VERDICT


So, depending on your situation, you choose what the best option for you will be. If you only want to delete these apps because they take more memory from your phone and you are running low on it, I would advise you not to root your phone.


The best thing for that situation would be to simply buy a better SD card for your phone. They aren’t really that cheap nowadays! You can buy the card and disable the apps that you find unnecessary.


If however you really want some apps gone from your phone and your phone doesn’t allow it, follow the steps that you have found in this article.


That would be it when it comes to this article! I hope you have enjoyed the article and I hope you have learned something new! Until next time, good luck with deleting your bloatware!Gihosoft Android data recovery Free is a super awesome software specialized in Android file recovery. With this program, you are able to recover deleted photos, music, videos, messages, contacts, call logs, WhatsApp messages, Viber chat history and more from Samsung, Huawei, LG, HTC, Motorola, Google, Oneplus, Sony, Lenovo, ZTE and other Android devices directly. Meanwhile, this Android data recovery software is available for both Windows and Mac platforms.https://www.gihosoft.com/android-data-recovery-free.html

Sunday, June 10, 2018

Backing up WeChat Data on iPhone

Backing up WeChat Data on iPhone

Back up WeChat Messages on iPhone


The Cloud backup feature is not supported from WeChat 6.2.5. However, WeChat will keep your chat history permanently within the application on your iPhone as long as you do not remove the app and the device has enough storage space.
Back up WeChat Chat History to PC


For this to work, you have to connect both your iPhone and PC to the same internet network. After connecting your devices to the same internet connection, follow the steps below:


Step 1: Open WeChat for Windows. Click More in the lower-left corner.


Step 2: Select Backup and Restore and then tap Back up on PC.


Step 3: Select the chat history to back up on your mobile device. Confirm for the backup process to begin. Keep the devices connected to the same internet connection for the back up to finish.


Do you like this story?


Sponsor Ads:


Gihosoft iPhone Data Recovery is a professional iPhone Data Recovery software to get back all your lost text message, photo, video, call history, note, contact and more from iPhone/iPad/iPod Touch. It offers a full solution to recover your lost data in different tough situations. Besides recovering data directly from iPhone, iPad and iPod touch, it also allows you to recover data from iCloud and iTunes backup files.


Top 7 Ways to Fix WeChat Update Stuck on iPhone/iPad

Top 7 Ways to Fix WeChat Update Stuck on iPhone/iPad


1Restart Your iPhone/iPad


Your iOS device may have a bug that is keeping the WeChat from finishing the update. This can be fixed by simply restarting the device via the following the steps below:
iPhone X


Step 1: Press both the side button and either volume up or down button. Hold the buttons until a slider shows.


Step 2: Drag this slider. This turns off the iPhone X.


Step 3: Press and hold the side button again until an Apple logo appears.


iPod touch, iPad, or iPhone 8 and Earlier


Step 1: Press and hold the Side (or Top) button until you see a slider.


Step 2: Drag this slider. Your device should turn off.


Step 3: Press and hold the Side (or Top) button again until an Apple logo shows.


2Manage Your iPhone Storage


An application update on iPhone/iPad will require some extra space. If this space is lacking in your device, you will experience the iPhone WeChat update stuck problem. To check and manage the space available on your iPhone, follow the steps below:


Step 1: Open Settings and then tap General.


Step 2: Click Storage & iCloud Usage and then tap Manage Storage.


Step 3: Confirm that you want to delete the apps you do not use or need. Then remove them from your device by tapping Delete App. Try updating your WeChat again.


3Clear WeChat Cache


WeChat stores data in its temporary storage which allows the data to be accessed faster. This makes the application quick in processing requests. However, the cache may be responsible for the WeChat crash or stuck. Follow the steps below to clear the WeChat cache.


Step 1: Tap [Me], then select Settings, tap on General, tap Storage, finally click Clear WeChat.


Step 2: Choose the chat logs and the groups you wish to clear.


Do you like this story?


Sponsor Ads:


Gihosoft iPhone Data Recovery is a professional iPhone Data Recovery software to get back all your lost text message, photo, video, call history, note, contact and more from iPhone/iPad/iPod Touch. It offers a full solution to recover your lost data in different tough situations. Besides recovering data directly from iPhone, iPad and iPod touch, it also allows you to recover data from iCloud and iTunes backup files.


Note: “Storage” only cleans up the cache for your WeChat chat sessions and will not remove your chat history. From version 6.3.24 of WeChat, this cache for the chat sessions will be automatically cleared up regularly.
4Toggle Airplane Mode on and off


Airplane mode may be interfering with your WeChat update. To eliminate iPhone WeChat update stuck problem which is caused by Airplane mode, follow the steps below:


Step 1: Open Settings and Scroll down until you locate Airplane Mode.


Step 2: Toggle off the Airplane Mode switch.


5Update WeChat Version


Sometimes, a WeChat update stuck or crash is as a result of you have an older version of the application on your iOS device. This can be fixed by updating your WeChat. To update your WeChat, you need to download the latest version at http://www.wechat.com/en/.
6Change Another Wi-Fi Hotspot


Updating WeChat requires an active internet connection. If the current Wi-Fi hotspot you are connected to is not working, you will experience the iPhone WeChat update stuck issue. To solve this, you can switch to a new Wi-Fi hotspot by following the steps below:


Step 1: Open Settings and then tap Wi-Fi. Turn it on if it is off.


Step 2: Tap the name of the Wi-Fi you wish to join. Enter a password if prompted.


7Reset Network Settings


Your iPhone/iPad may have a network issue that prevents it from connecting to the internet. This issue can be fixed by following the steps below:


Step 1: Open Settings and tap General.


Step 2: Tap Reset and then click Reset Network Settings.


Step 3: Enter your passcode if prompted for one. Tap Reset Network settings then.