Thursday, June 13, 2019

7 New Mac Notebooks Registered by Apple in Eurasian Database


Apple has registered seven new Mac models with the Eurasian Economic Commission database. Apple registers new Macs and devices with the EEC ahead of their release in the Eurasian region.

The new models registered by Apple include:


A2141


A2147


A2158


A2159


A2179


A2182


A2251

The filling from Apple points to all these new models being portable computers. Given that Apple has already unveiled its 2019 refresh of the MacBook Pro lineup, it is possible that we are looking at a potential 12-inch Retina MacBook refresh which was last updated in 2017. If refreshed, the 12-inch MacBook will likely come with faster chips from Intel for better performance. It is not expected to receive any other meaningful update.

It is also possible that we are looking at a refresh of the non-Touch Bar MacBook Pro models but the chances of that happening are relatively slim.

Apple and other companies are required to register their new and upcoming devices with the Eurasian database before they can release it to the public in Armenia, Belarus, Russia, and other countries which are a part of Eurasia.

Over the last year or so, in most cases when Apple registers new products with the EEC, it goes ahead and unveils them within a few weeks. This likely means that we should see Apple announce the refreshed 12-inch Retina MacBook in July.

Are you looking forward to a 12-inch MacBook refresh?

[Via MacRumors]

Sponsor ads:

Gihosoft RePicvid Free Photo Recovery Software provides a free photo recovery software for windows to help users recover the deleted or lost photo for free.

If you lost data after you updated to a new iPhone, you can always use Gihosoft iPhone Data Recovery to get the data back from the old iPhone or backup.You may also like: iphonerecovery.com

iPhone Manager:Get the ultimate Gihosoft iPhone Manager. Free download for PC/Mac.

Thursday, June 6, 2019

How to Bypass FRP on Samsung Galaxy S8 without PC (May Not Work)


How to Bypass FRP on Samsung Galaxy S8 without PC (May Not Work)

As you know, FRP was a Google creation for its Android OS for protection purpose. Some sites claim that the steps below can be used to bypass FRP on Samsung S8 successfully. But when I try, I found it difficult to figure it out and the lock was not fixed finally. If you would like to try, just follow:

Step 1: Open your Samsung S8 and try to set it up. Make sure you connect your Samsung S8 to a Wi-Fi network.

Step 2: Go back to the Samsung welcome page, open TalkBack with 2 fingers.

Step 3: Select EMERGENCY CALL at the bottom.

Step 4: Call 112. Quickly double click on the “+” icon.

Step 5: Press the Power and Volume Up button at the same time to turn off TalkBack.

Step 6: Tap Add to contacts from the list menu.

Step 7: Create a new contact and save it.


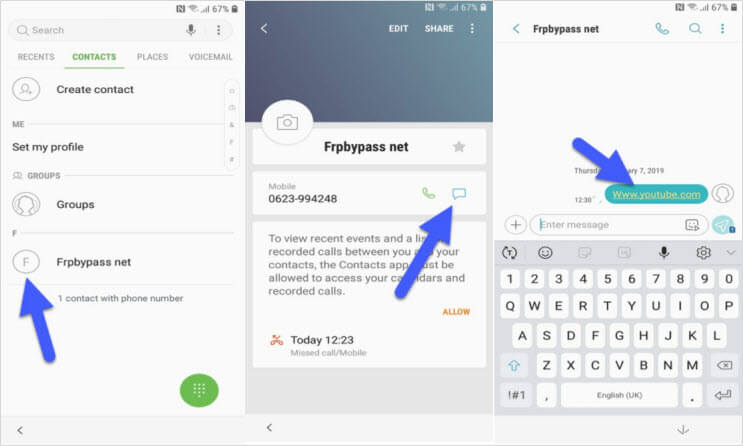
Step 8: Then go to the contacts list to click the contact you added.

Step 9: Click to send a new message. In the message field, type www.youtube.com and send it.


Step 10: Simply tap the message and it will open the Youtube app.

Step 11: Click the link in the description and it will open the Google Chrome app.

Step 12: Open the page: https://frpbypass.net/download-frp-tools-free-bypass-frp-apk-pc-tools/ and download the Apex Launcher.Also Read:15 Game Torrenting Sites to Download Games in 2019

Also Read:5 Best Free Backup Software for Windows

Also Read:KissAsian to Watch Asian Movies

Also Read:5 Best Websites Like Afdah for You to Stream Movies in 2019


Step 13: On Google Chrome, go to Bookmarks > History > Download History and install the Apex Launcher on your device. Open the apk when it has installed.

Step 14: Go to Settings > Lock screen security > Other security settings device > Administration on your device.

Step 15. Turn the “Find My Device” off.

Step 16: Then go back to Settings and click on Apps.

Step 17: Tab on the 3 dots and select Show system apps.

Step 18: Go to Google Account Manager > Storage > Clear Data and disable it.

Step 19: Go to Google Play Services > Storage > Manage Storage > Delete All Data and disable it.

Step 20: Now, you can download and install the bypass FRP apk on your device.

Step 21: Go to Settings > Cloud & accounts > Add account > Google.

Step 22: Sign in with your Gmail account and confirm it.

Step 23: Then go to Settings > Apps > Disabled > Enable Google Play Services.

Step 24: Finally, restart your Samsung Galaxy S8 and activate the FRP bypass.
Cons of This Method:


It’s a long and somehow complicated process of bypassing Samsung FRP lock. This is the major reason that stops most users using this method.


This method doesn’t work for all Samsung devices. It’s just for some specific models.

Wednesday, June 5, 2019

iOS 13 Introduces New 'Optimized Battery Charging' Feature


Apple in iOS 13 introduced a new "Optimized Battery Charging" feature, which is designed to extend the total battery life of your iOS device.


Found in the Battery section of Settings under "Battery Health," the optional toggle learns from your personal habits and waits to finish charging all the way up until you need your iPhone.


For example, if you often charge your phone up at night while you sleep, Apple might charge it to 80 percent right away, but wait until an hour or so before you wake up to charge the remaining 20 percent.


That keeps your iPhone at an optimal capacity for battery health, rather than keeping it close to 100 percent on the charger.


Avoiding topping up the battery continually while it sits on the charger reduces the amount of time that your device spends at maximum capacity, and over time, this could extend the life of your battery.


Battery health has been a hot topic over the course of the last year, after Apple was found throttling the processor speeds of iOS devices with degraded batteries to prolong device life as long as possible.


That issue spurred Apple to be more forthcoming about overall battery health, providing details about capacity and performance in the Battery portion of Settings. Aside from the new toggle to optimize charging, there are no major changes to the Battery Health feature in the first iOS 13 beta.Also Read:Best free Beat making software

Also Read:view private Instagram Profiles

Also Read:Permanently Delete Line Messages and Chat History on iPhone

Also Read:Hack Facebook account online of any user? Full 100% working

Also Read:Top 11 Icon Packs for Android to customize all the icons present 2019

Also Read:File Systems: FAT32 vs. exFAT vs. NTFS

Sunday, May 26, 2019

Top 7 Solutions to Fix Hulu Not Working on Apple TV


Solution 1. Check the Compatibility

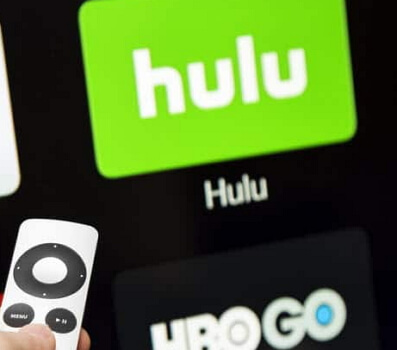
First of all, you should check if the Apple TV is compatible enough to run Hulu app. In fact, your Apple TV must be 4th generation or newer to run Hulu app on it.
Solution 2. Restart Apple TV

If the device is compatible enough, you will have to perform a restart to check if the problem is resolved. In fact, restarting can resolve various minor issues related to apps run on Apple TV.

Step 1: Go to Settings on your Apple TV device and select the option labeled “General”.

Step 2: Navigate to the “Restart” option found in the list of options and select it.


Solution 3. Update Apps on Apple TV

If the problem persists, you should try updating the apps on Apple TV.

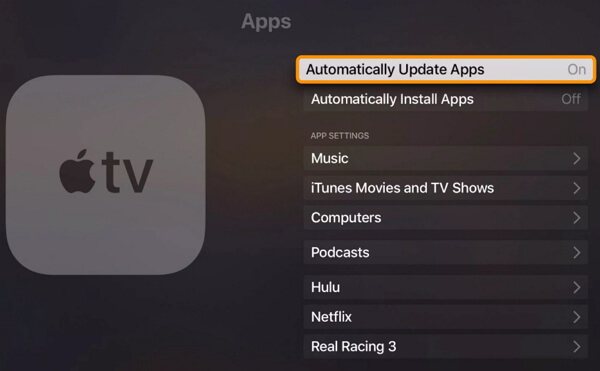
Step 1: Go to Settings app on your Apple TV device and select the option “Apps”.

Step 2: Select the option “Automatically Update Apps” from the options.

Step 3: Let the apps be updated automatically now. Give it some time and check if the app is updated. To do that, you should go to “Purchased” on App store. Then, select “Recently Updated”.


Solution 4. Restart Hulu App

If you are yet to succeed, you can try restarting Hulu app.

Step 1: Get the Apple TV turned on (if it is still switched off).

Step 2: Let the TV be on home screen. Double click the TV button on the remote.

Step 3: Now, on the Trackpad, you should swipe right and locate Hulu app. Once located, just swipe the app up to close the app.

Step 4: Exit the multitasking mode simply by hitting the menu button on the remote. Launch Hulu once again to see if it works now.


Solution 5. Turn off Send Data to Apple

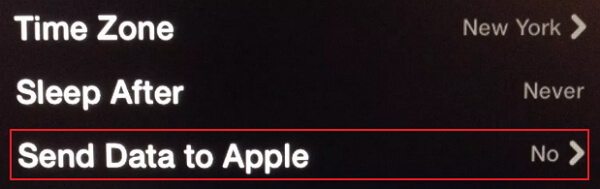
If you do not have any luck yet, you are able to try turning off “Send data to Apple”. By turning off this feature, you stop Apple TV from communicating with their servers while using Hulu. This is especially applicable for slower internet connections.

Step 1: Go to Settings app on your Apple TV and select the option “General”.

Step 2: Then, select the option Send Data to Apple and turn the settings off.


Solution 6. Restore Apple TV to Factory Settings

Restoring Apple TV to its factory settings can resolve various issues. Mentioned below are the steps you can follow to fix this issue.

Step 1: Go to Settings option and select General. Then, go to Reset.

Step 2: Select the option Restore. This will lead to install the latest update as well.


Important: You should also remember that this is a pretty desperate measure. However, it might work for most users. As a result of restoring the device, you need reconfigure all the settings of the device. Also, the passwords will be reset and you will have to reenter everything related to remote, AirPlay and WiFi. So, you should opt to this measure as the last resort.
Solution 7. Fix Hulu Not Working on Apple TV without Data Loss

Also Read:Best free Beat making software

Also Read:view private Instagram Profiles

Also Read:Permanently Delete Line Messages and Chat History on iPhone

Also Read:Hack Facebook account online of any user? Full 100% working

Also Read:Top 11 Icon Packs for Android to customize all the icons present 2019

Also Read:File Systems: FAT32 vs. exFAT vs. NTFS

Also Read:Test RAM Memory for Windows and Mac in 2019

Monday, May 20, 2019

How to Fix iPhone App Store Not Downloading Apps


iPhone is home to an abundant number of apps. The go to place to download these amazing apps is called the Apple App Store. But, in some situations, the iPhone App Store won't load or download apps on iOS 12/11 even after repeated attempts. This happens when there is a bug on your phone. Sometimes, due to some software glitches, your App Store not working even though your internet connection is fine. Fortunately, you have come to the right place. After going through the article and carefully following every step accurately, the apps not downloading in App Store on iPhone will be surely be fixed, hopefully never to return again. And you will be back to downloading apps in no time!
Solution1:Clear App Store Cache

What do you do when your iPhone app store won't load? An effective method to fix this problem is by clearing the App Store cache in your iPhone. You can do this by first launching the App Store app in your iPhone or iPad and tapping any of the navigation buttons 10 times (Featured, Explore, Top Charts, Updates, Search). This will immediately clear all the existing cache from your iPhone. It also forces the App Store app to re-download all the information from the start. This procedure can often solve the weird bugs your iPhone might face.


Solution 2: Force Refresh App Store

Go to App Store or the App Store on your iPad normally and tap down the App Store icon until you see spinning cursor notification on the top of the screen. You need to tap at the top of the screen.


This forces the Apple App Store to refresh and update instantly. This pull down and refresh function will let you see any available updates for your App Store.
Solution 3: Force Quit App Store

When you see that your App Store is not responding, you have to force quit the App Store on your iPhone as it cannot be closed with the normal procedure. To access this feature, you need to go the fast app switcher on your Apple phone by tapping the home button twice. Slide through to the App Store and swipe up the app to force quit it.


Solution 4: Access App Store with Cellular Data

"Why won't my App Store load" has been asked by many users. Sometimes, by mistake, people tend to withdraw access to cellular data for the App Store. In such cases, your App Store might fail to connect to the internet. In order to solve this issue, simply turn on cellular data.


Next, turn on the button for App Store so that your Apple phone gives the App Store permission to access your cellular data.


Solution 5: Sign out of iTunes & App Store

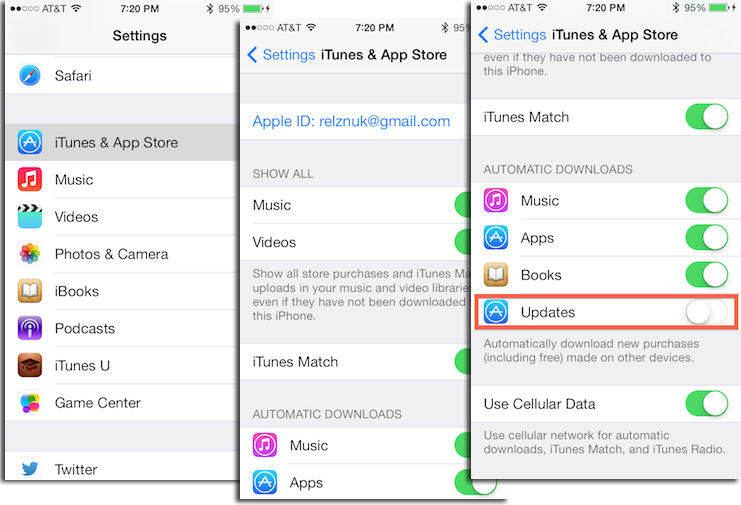
You can sign out of your iTunes account or your App Store and sign in again to try and solve the issue. You can do this by first launching the settings tab and going to the iTunes and App Store option.


Now simply tap on your Apple ID and click the sign out option.


After you have successfully signed out of your account, go to the same tab and sign in to your Apple account with your ID and password.
Solution 6: Update iPhone Software

Open the settings tab and then open the option with name 'General'.After which you need to tap the software update option. Then click "Download and Install" to start.


Solution 7: Restart/Force Restart Your iPhone

If you need to restart your iPhone, you need to long press and hold the sleep/wake button of your iPhone and patiently wait until the power off option appears on your phone. For iPhone X/XR/XS, you need to press and hold the Side button and either volume button until the power off slider appears.

If a simpe restart does not help fix this problem, you can force restart your iPhone X/XR/XS/8/7/6s/6.

For iPhone X/XR/XS/8


Press and release the Volume Up button, then Press and release Volume Down button.


Now, press and hold the Power switch and leave when the Apple logo appears. Keep in mind to do these three steps in quick succession.


Enter passcode to complete the process.

For iPhone 7/7 Plus:


Press Power switch on the right side plus the Volume down button on the left side together.


Now, wait for the Apple logo and leave. Then wait for the startup sequence.

For iPhone 6/SE or Earlier:


Press the Home button and the Power switch simultaneously.


Wait for the Apple logo to appear and leave the buttons.


The phone will go into the startup sequence.


After sometime enter your passcode when prompted.


Solution 8: Reset Network Settings

From the Home screen of your iPhone, navigate to the settings and then tap the general button and then tap the reset button. After which you need to tap the 'reset network settings' button. You will be asked to enter your passcode. When you successfully enter the passcode of your Apple phone, your phone's network settings will be reset successfully.


Solution 9: Check App Server

Sometimes the App Store down because the server is down. To check the app server on your iPhone, go to the 'System Status webpage' on your iPhone, after which you will see the current server status of all your apps. You will be notified if something is wrong with your apps in this page.


Solution 10: Reset iPhone Settings

Before restoring iPhone to factory settings, you need to ensure that all your data is backed up. After you get that step out of the way, you are ready to perform the factory reset. This procedure will completely wipe out all the data on your phone and restore it to how it came out from the factory.

Go to Settings > General > Reset -> Reset All Content and Settings.


Extra Bonus: How to Fix iPhone Stuck and Crashing Also Read:Watch Soccer Live on TV
Also Read:movie4k alternatives
Also Read:10 Websites to Watch Indian Live Television
Sponsor ads:
Gihosoft RePicvid Free Photo Recovery Software provides a free photo recovery software for windows to help users recover the deleted or lost photo for free.
If you lost data after you updated to a new iPhone, you can always use Gihosoft iPhone Data Recovery to get the data back from the old iPhone or backup.You may also like: iphonerecovery.com
If you use android phones, please choose Gihosoft Android Data Recovery.With Gihosoft Android Data Recovery, no longer afraid of data loss!
iPhone Manager:Get the ultimate Gihosoft iPhone Manager. Free download for PC/Mac.

Friday, April 26, 2019

iPhone 11 Max CAD Renderings and 360-Degree Video Leaks


A day after @onleaks posted 3D CAD renderings of the 2019 iPhone 11, he has now posted detailed 5K renders and 360-degree video of the 2019 iPhone 11 Max.

The 3D CAD renders show the iPhone 11 Max coming with a triple camera set up at the rear which does help give the rear a refreshed look. As for the front, it looks largely the same, with minimal bezels and a notch at the top to house the required Face ID sensors.

The iPhone 11 Max will be 8.1mm thick which means it is going to be notably thicker than the 7.7mm iPhone XS Max. Thankfully, if previous leaks are anything to go by, the thickness will be used by Apple to incorporate a larger battery on the handset. This will be beneficial since the iPhone 11 Max will come with reverse wireless charging which can be used to wirelessly charge other devices.


Like the iPhone 11, the iPhone 11 Max will feature a redesigned mute button that looks similar to previous iPads. It will also feature a Lightning connector at the bottom and not USB-C. The CAD renders point to the iPhone 11 Max featuring a single slab of glass at the rear which will also cover the triple-camera housing. This is different from the iPhone X/XS in which the rear glass has a cutout for the camera housing.
Our Take

As expected, the iPhone 11 Max is just a bigger version of the iPhone 11. The major highlight of both phones is going to be the triple camera set up at the rear along with the use of a frosted glass panel. It is likely that we will see Apple launch the 2019 iPhone 11 in new colors or finish to ensure that customers don’t complain about the design being outdated.

[Via CashKaro]

Sponsor ads:

Gihosoft RePicvid Free Photo Recovery Software provides a free photo recovery software for windows to help users recover the deleted or lost photo for free.

If you lost data after you updated to a new iPhone, you can always use Gihosoft iPhone Data Recovery to get the data back from the old iPhone or backup.You may also like: iphonerecovery.com

If you use android phones, please choose Gihosoft Android Data Recovery.With Gihosoft Android Data Recovery, no longer afraid of data loss!

Wednesday, April 24, 2019

Hack Pattern Lock Screen on Android Phones?


1 Hack Android Pattern Lock using Android Device Manager

Android Device Manager is certainly the second ultimate method you can use to crack pattern lock screen on an Android device. It is a feature that is present in all Android devices by default so that users can locate their device remotely in the case of missing or lost the device. You can use this service to unlock your Android device pattern lock as long as you are logged into the Google account. Fortunately, it is easy and simple to bypass your device pattern lock by taking assistance from this service. You can access this service on any device or computer.

Here is the simple guide on how to bypass Android pattern lock using Android Device Manager:

Step 1 To begin the process, access the Android Device Manager on your computer and then, log-in with Google account you are using on locked Android device.

Step 2 After that, choose your device and next, select "Erase" option from the main interface. This will erase Android phone completely.


Pros:


The process is short and simple.


It is the best way to unlock Android tablets and phones remotely.

Cons:


It might fail if the Android phone is not compatible.


You can unlock Android screen lock with this method if your Android phone is switched off.
Method 2: Reset Pattern Lock Using Samsung's 'Find My Mobile' Service

Find My Mobile is one of the ultimate methods to crack a pattern lock if you are a Samsung user. It is service provided by Samsung to users when they want to find their lost device or unlock their device in case of a forgotten password.

Here is the simple guide on how to break pattern lock on Android phones using 'Find My Mobile' service:

Step 1 To commence the process, access the Find My Mobile service on your computer. Next, you need to log-in with your Samsung Account to begin the process.


Step 2 Next, click on the "Unlock my Device" option from the left side-bar menu. After that, click on the "Unlock" button to execute pattern unlock on your phone.


Step 3 After your Samsung device is unlocked, you will get a message on your device.

Pros:


The process is simple and easy.


It is great for Samsung users.

Cons:


This service works only for Samsung devices.


It will not work if you have not set up a Samsung account.
Method 3: Bypass Pattern Lock on Android Phones Using "Forgot Pattern" (Android 4.4 or Below)

If you are having an Android device running with 4.4 or older version, then you can use Forgot Pattern feature to bypass pattern lock on Android device. It is the best method for those who are looking for a way on how to hack the Android pattern lock without any software.

Here is the simple guide on how to unlock pattern lock on your phone using the Forgot Pattern feature:

Step 1 To begin the process, enter the wrong pattern on your phone to get the "Forgot Pattern" option as shown in below figure. After you got the option, then click on it.


Step 2 After that, choose the option to bypass your phone pattern lock with your Google account. Here, you need to enter your Google credentials that are linked to your locked device.

Step 3 Next, Google will send you an email to unlock pattern or you will be able to reset your pattern lock right away.


Method 4: Factory Reset to Break Pattern Lock on Android Phones

The last method you can try to break pattern lock on an Android device is factory reset. Consider this method only when all the above method fails as this method will erase all the data and settings on your Android phone. To learn how to remove pattern lock on Android phone using factory reset, follow the below steps:

Step 1 To commence the process, enter your device in Recovery Mode. You can do this by pressing Power, Volume up and Home button together.

Step 2 Next, choose "Wipe data/factory reset" option using volume down and up key.


Step 3 After that, you need to confirm that you are sure to perform a factory reset on your device. Reboot your device once the process is completed and you will be able to access your locked Android device.Also Read:12 Best Alluc Alternatives Letting You Stream Movies and More in 2019

Also Read:Top 25 Best Netflix Cookies for You to Use Netflix for Free 2019

Also Read:Top 10 Best Rainierland Alternative Websites for You to Watch Movies in 2019

Also Read:Best KeepVid Alternative Websites For You to Download Videos 2019

Also Read:Delete Viber Message History on Your iPhone

Also Read:5 Best iOS Photo Backup Services in 2019

Also Read:Ultimate Guides to Fix Activation Error on iPhone in 2019

Also Read:What if There is Bad ESN or Blacklisted IMEI on Your iPhone

Also Read:Top 5 Free Converters to Convert MKV to MP4 with High Quality

Also Read:How to Recover Deleted Safari Bookmarks & History on iPhone or iPad

Also Read:Setup Dual Monitors in Windows 10 Computer 2019