Sunday, March 3, 2019

How to Fix “iTunes Unable to Process Purchases at This Time” Issue


Apple Inc. is an American multinational technology company. They are one of the greatest technology companies and are the world's ninth-largest company by revenue. Now, you own an iPhone which you have probably been using for weeks/months/years, but then as you try to make a music or app purchase from iTunes Store or maybe you just wanted to open an already installed app on your iPhone you get an error message that reads “iTunes unable to process purchase at this time” or “iTunes purchase could not be completed” how will that make you feel? Not too good I guess!

Early this year, quite a number of iOS device users complained about an outage of “iTunes unable to process purchases at this time” error message and has since been looking for a way to fix this problem. Normally, this is a regular iTunes Store warning that often comes up when the device user tries to make a purchase with an insufficient credit card. However, the current error message on iTunes now appears even when a user wants to launch his apps, so basically the entire apps on the iPhone ceases to function properly with the current iTunes Store error.

We have decided to come up with this article to help those who find themselves battling with this error message, giving them a way out. We’ll be showing you different approaches to take to help you solve this problem. Read on, and follow the steps below to regain control.


Part 1: Fix "iTunes Unable to Process Purchases at This Time" Issue

Also Read:Create Boomerang from Existing Videos on Android/iPhone 2019

Also Read:Rotate Video on Facebook 2019


Part 2: iTunes Unable to Process Purchases? Transfer Them Using 3-Party Tool
Fix "iTunes Unable to Process Purchases at This Time" Issue

If you are one of those that have been getting the “iTunes unable to process purchase at this time” or “iTunes unable to purchase” error follow the instructions below to break free.
1. Check Your Credit

For those that have been trying to make payment but can’t because the error message keeps popping up, the first thing you need to do is to check your credit balance. To do that launch iTunes or App Store and sign in. Make sure you’re using the correct Apple ID during sign in. Your credit balance will now be made available to you beneath your Apple ID.
2. Logout and Log Back In

Do not be in a hurry to sign out from your account especially if you don’t remember your account passcode, but if you do what you’ll want to do is to sign out and then sign back in. This will work if you’re getting the “Credit card processing is temporarily unavailable” error message. Go to settings, click on your Apple account, scroll down and sign out your Apple ID. After doing that, wait a few minutes and then log back into your account and check if it’s functioning okay now.Also Read:Voice Changing Apps & Software for Skype
Sponsor ads:Fix SD Card Error on GoPro Hero
3. Disable Firewall

Unknown to most, firewall set to block iTunes Store might actually be the reason behind the error message. Some companies provide devices to their staff but because a network firewall has been enabled they will be denied access to iTunes. Follow the steps below to disable firewall:


Tap Apple menu.


Launch System Preferences and choose Security & Privacy.


Select the Firewall tab.


Enter the correct administrator's password if required.


If you have the firewall set to block incoming connections, you’ll have to change it. Allowing incoming connections should fix “iTunes unable to process purchases at this time” popup error message and related iTunes problems.
4. Install Latest iOS Version

Keeping your device updated is also another simple, yet effective way of fixing this problem. Having an up-to-date iOS version on your device reduces the chance of experiencing this error.


Click on Settings and open General tab.


Hit Software Update to check for a new version of your iOS.


If there is an available update, tap the Install button to install.
5. Check Apple Server Status

You have tried all the solutions provided above and none still seems to work for you, what do you do now? This might be the time for you to exercise a little bit of patience for Apple’s iTunes Support to release a fix. You can always check out the Apple System Status website for server status.Sponsor ads:

Gihosoft Free iPhone Data Recovery:https://www.gihosoft.com/iphone-data-recovery-free.html

Gihosoft iPhone Data Recovery Free

Free iPhone Data Recovery Software for Windows/Mac

Recover up to 12+ types of files, including contacts, SMS, photos, WhatsApp, Viber, notes, etc.

Restore lost data from iOS devices directly or from iTunes and iCloud backup

Recover iPhone data lost due to iOS upgrade/jailbreak, accidental deletion, device lost or broken

Support all the latest iPhone, iPad and iPod Touch

Both Free and Pro version.

If you lost data after you updated to a new iPhone, you can always use Gihosoft iPhone Data Recovery to get the data back from the old iPhone or backup.You may also like: iphonerecovery.com

If you use android phones, please choose Gihosoft Android Data Recovery.

With Gihosoft Android Data Recovery, no longer afraid of data loss!

Must read:Youtube video downloader for pc

Gihosoft RePicvid Free Photo Recovery Software provides a free photo recovery software for windows to help users recover the deleted or lost photo for free.

Jihosoft Android Data Recovery: the best Android Data Recovery software for Windows and Mac to recover deleted contacts, messages, photos, videos, WhatsApp and etc from Android devices.Tips:How to transfer messages from iPhone to iPhone

jihosoft Free iPhone Data Recovery

Restore Deleted Songs from iPhone 2019

Restore Deleted Songs from iPhone 2019
Restore Deleted Songs from iPhone by Re-downloading Them

Sometimes, you may mistakenly delete the purchase the song from your iPhone device. In this kind of situation, you will need to re-download the process the song on your iOS device. Here is the complete process that you will follow it:


First of all, open iTunes store app


On your device, click the option of More > Purchased that you will find on the bottom of the screen


Select the photos you want to import and click on “Import Selected” or click on “Import New” if you want to import all pictures.


Select the photos you want to import and click on “Import Selected” or click on “Import New” if you want to import all pictures.


It is the complete process that you will follow to install the deleted song on your iOS device. If you don’t want to get any kind of inconvenience to get your deleted music. This process is very quick because iMyFone TunesMate provides all in one solution for the transfer of all kinds of media files from iTunes to iPhone or other iOS devices and vice versa. You just need to visit the official website and download it to your Windows on Mac PC to use all these features without any kind of inconvenience. After that, you will never stay away from your favourite media files on your iOS devices.Sponsor ads:

Gihosoft Free iPhone Data Recovery:https://www.gihosoft.com/iphone-data-recovery-free.html

Gihosoft iPhone Data Recovery Free

Free iPhone Data Recovery Software for Windows/Mac

Recover up to 12+ types of files, including contacts, SMS, photos, WhatsApp, Viber, notes, etc.

Restore lost data from iOS devices directly or from iTunes and iCloud backup

Recover iPhone data lost due to iOS upgrade/jailbreak, accidental deletion, device lost or broken

Support all the latest iPhone, iPad and iPod Touch

Both Free and Pro version.

If you lost data after you updated to a new iPhone, you can always use Gihosoft iPhone Data Recovery to get the data back from the old iPhone or backup.You may also like: iphonerecovery.com

If you use android phones, please choose Gihosoft Android Data Recovery.

With Gihosoft Android Data Recovery, no longer afraid of data loss!

Must read:Youtube video downloader for pc

Gihosoft RePicvid Free Photo Recovery Software provides a free photo recovery software for windows to help users recover the deleted or lost photo for free.

Jihosoft Android Data Recovery: the best Android Data Recovery software for Windows and Mac to recover deleted contacts, messages, photos, videos, WhatsApp and etc from Android devices.Tips:How to transfer messages from iPhone to iPhone

jihosoft Free iPhone Data Recovery

How to Offload Unused Apps on iPhone


Method 1: Uninstall Unused Apps Manually

To uninstall unused apps by picking them one by one, follow the steps mentioned below:

Open the “Settings” in your iPhone.

Tap on “General”, followed by “iPhone Storage”.


Tap on the app you want to offload.

Click “offload apps”.


Method 2: Uninstall Unused Apps Automatically

You can also offload unused apps from your iPhone by enabling the “offload app” feature which automatically removes unused apps that are eating your iPhone’s storage space. Follow the steps mentioned below to enable the automatically offload feature:

Open the “Settings” in your iPhone.

Tap on “General”, followed by “iPhone Storage”.

Under recommendations, you will find the option and click on it to enable it.


However, this method is not recommended as sometimes, the iPhone ends up removing apps that you use occasionally.
Method 3: Offload Unused Apps Using iTunes

If you feel comfortable using iTunes for all your iPhone related chores, then here’s how you can offload unused apps from your iPhone using iTunes. Follow the steps mentioned below:

Open iTunes.

Click on “Apps” in the iTunes library.

Right click the app you wish to remove and click on “delete”.

Click “move to trash” when prompted to do so..

Empty the trash to remove the deleted apps temporarily.


Method 4: Offload Unused Apps Using iMyFone Umate Pro
Sponsor ads:10 Best Offline Navigation Maps Apps for iPhone and iPad in 2019
Sponsor ads:Top 6 Anonymous Messaging Apps for iPhone: What You Need to Know?


Sponsor ads:How to Fix Android File Transfer Not Working Error and Its Best Alternatives

Catching the Cloud and Erasing its Data – How to Erase iCloud Data


Catching the Cloud and Erasing its Data – How to Erase iCloud Data 2019
iCloud is free storage space that is offered to all Apple users. Unfortunately, space is not unlimited. Yes, you can always buy more storage space from Apple, but most people simply prefer to erase unneeded data when they need more space. But storage space isn’t the only reason that someone may opt to clear data from the Cloud. The “Cloud” is the internet. And as we know, even the most secure things on the internet risk leakage. iCloud data is no exception. So if any of your personal, private, or confidential information has been stored in the Cloud, you should delete erase iCloud data right away. Today we will discuss how.


Part 1: How to Erase iCloud Data on iPhone


Part 2: How to Erase iCloud Data on Computer


Part 3: Is Your Information on iCloud Really Safe?
Part 1. How to Erase iCloud Data on iPhone

If you want to erase iCloud data on your iPhone, our best advice is to delete your backups. Your backups can date all the way back to your very first iPhone, so as you can imagine, they can take up a lot of storage space. Here’s how to do it:

Step 1: Open the Settings app on your iPhone

Step 2: Click on “iCloud”

Step 3: Click on “Manage Storage”


Step 4: Click on “Backups”

Step 5: Choose your iPhone device

Step 6: At the bottom of the screen, click on “Delete Backup”


Part 2: How to Erase iCloud Data on Computer

Some of us prefer to clear iCloud data on a computer. If this sounds like you, you may be doing so from a) a Mac or b) a windows computer. Today we will show you how to do it on both.
A) How to clear iCloud data on a Mac

Step 1: Click on the apple icon in the top left hand corner of your Mac screen.

Step 2: Click on “System preferences”

Step 3: Click on the “iCloud” option

Step 4: Sign in to your Apple ID

Step 5: In the bottom right hand corner of the window, click on “Manage”

Step 6: On the left hand menu, click “Backups”

Step 7: Choose the backup you want to delete.

Step 8: Click “Delete” Sponsor ads:5 Best Photo Resizer Apps for Android 2019
Sponsor ads:Best 6 Photo Organizer – Photo Organizing Software for Windows & Mac
Sponsor ads:10 Best Translation App for iPhone or iPad in 2019

Step 9: When a pop-up appears, click delete again Repeat this process for as many backups as you would like to delete.


B) How to clear iCloud data on Windows

Step 1: Click on the iCloud icon to launch iCloud

Step 2: Click “Manage” on the control panel

Step 3: On the left hand menu, click “Backups”

Step 4: Select the back-up that you would like to delete, and click “Delete”

Step 5: Confirm your choice.


Please not that in order to clear iCloud data on a windows computer, you will first need to download the iCloud app. You can do so on the Apple website.
Part 3: Is Your Information on iCloud Really Safe?

In fact, there is no application or website on the internet that can make this claim. Why? The sad truth is that if you are connected via internet, there is always the possibility of leaked data - no matter how secure you are. Hackers are good at what they do, which is why even the world’s most secure companies are at risk.

So is iCloud secure? Definitely. Is it 100% secure? Definitely not! All it takes is one good hacker to obtain access to all of your personal information, files, and data. Our suggestion? Don’t save your personal or private information with iCloud. As a general rule of thumb, if it is something you do not want others to see, it should not be in the Cloud.Sponsor ads:

Gihosoft Free iPhone Data Recovery:https://www.gihosoft.com/iphone-data-recovery-free.html

Gihosoft iPhone Data Recovery Free

Free iPhone Data Recovery Software for Windows/Mac

Recover up to 12+ types of files, including contacts, SMS, photos, WhatsApp, Viber, notes, etc.

Restore lost data from iOS devices directly or from iTunes and iCloud backup

Recover iPhone data lost due to iOS upgrade/jailbreak, accidental deletion, device lost or broken

Support all the latest iPhone, iPad and iPod Touch

Both Free and Pro version.

If you lost data after you updated to a new iPhone, you can always use Gihosoft iPhone Data Recovery to get the data back from the old iPhone or backup.You may also like: iphonerecovery.com

If you use android phones, please choose Gihosoft Android Data Recovery.

With Gihosoft Android Data Recovery, no longer afraid of data loss!

Must read:Youtube video downloader for pc

Gihosoft RePicvid Free Photo Recovery Software provides a free photo recovery software for windows to help users recover the deleted or lost photo for free.

Jihosoft Android Data Recovery: the best Android Data Recovery software for Windows and Mac to recover deleted contacts, messages, photos, videos, WhatsApp and etc from Android devices.Tips:How to transfer messages from iPhone to iPhone

jihosoft Free iPhone Data Recovery

How To Save iTunes Library To External Hard Drive 2019

How To Save iTunes Library To External Hard Drive
Generally, backing up your iTunes library to your computer or to an iDevice is very crucial and highly recommended. However, having a backup on an external hard drive gives you an added advantage in an event of a computer or phone crash. To successfully achieve this, you’ll want to ensure the external hard drive has sufficient space for a complete backup. Once that is done, you can proceed with the following steps:

1. Look for the iTunes Media Folder

Before progressing with the backup, you’ll have to locate the iTunes media folder on your computer. Follow the simple steps below to do that:

For Mac: Go to Finder and then choose your username, hit iTunes
For Windows:

Windows Vista or later: Users >> username >> Music

Windows XP: Documents and Settings >> Username >> My Documents >> My Music

If you followed the paths as described above and you still weren’t able to locate your iTunes media folder, this guide will show you how to go about it:

Launch iTunes application.

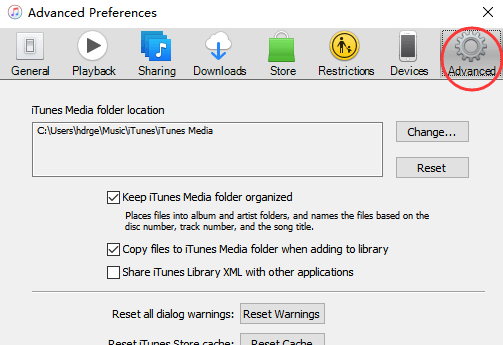
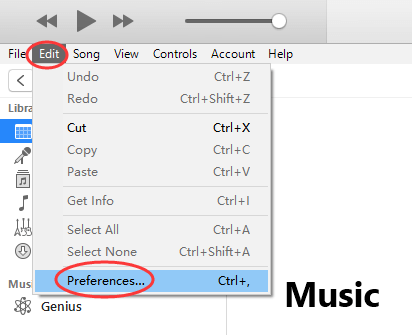
Click on the "Edit >> Preference" window to open.


Hit the "Advanced" tab.


The box below the iTunes Media folder location shows the location of your iTunes media folder on your computer.


2. Consolidate iTunes Library


Now that you have successfully found the location of your iTunes media folder, the next thing would be to consolidate your iTunes library. Consolidating your iTunes library means making sure all of your iTunes files including your music, videos, etc. are in one place. Take the steps below to consolidate your iTunes library:


Launch iTunes application.


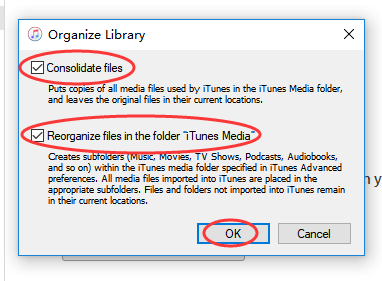
Tap the "File menu >> Library >> Organize Library".


A window pops up, choose "Consolidate files". This will move every used file in your iTunes library to one location.


Next to Reorganize files in the folder "iTunes Media" is a box, check the box. If you have your files organized into subfolders already for Music, TV shows, podcasts, audiobooks, movies, etc. the box will be greyed out and not clickable.

Sponsor ads:Best 5 Android Apps to Change Photo Backgrounds

Sponsor ads:How to Unblock Blocked Websites with 5 Methods 2019

Sponsor ads:HTC Sync Manager Review

Sponsor ads:How to Delete Embarrassing Word Suggestions from Android KeyboardSponsor ads:What is iTunes Helper & How to Disable it from Windows/Mac PC


Hit "OK" to consolidate and organize your iTunes library.Sponsor ads:


Gihosoft Free iPhone Data Recovery:https://www.gihosoft.com/iphone-data-recovery-free.html


Gihosoft iPhone Data Recovery Free


Free iPhone Data Recovery Software for Windows/Mac


Recover up to 12+ types of files, including contacts, SMS, photos, WhatsApp, Viber, notes, etc.


Restore lost data from iOS devices directly or from iTunes and iCloud backup


Recover iPhone data lost due to iOS upgrade/jailbreak, accidental deletion, device lost or broken


Support all the latest iPhone, iPad and iPod Touch


Both Free and Pro version.


If you lost data after you updated to a new iPhone, you can always use Gihosoft iPhone Data Recovery to get the data back from the old iPhone or backup.You may also like: iphonerecovery.com


If you use android phones, please choose Gihosoft Android Data Recovery.


With Gihosoft Android Data Recovery, no longer afraid of data loss!


Must read:Youtube video downloader for pc


Gihosoft RePicvid Free Photo Recovery Software provides a free photo recovery software for windows to help users recover the deleted or lost photo for free.


Jihosoft Android Data Recovery: the best Android Data Recovery software for Windows and Mac to recover deleted contacts, messages, photos, videos, WhatsApp and etc from Android devices.Tips:How to transfer messages from iPhone to iPhone


jihosoft Free iPhone Data Recovery


Note: Rather than moving the files, consolidating files will actually create duplicate files. To save space you might want to delete the duplicates.

3. Save iTunes Library to External Hard Drive


You found your iTunes media folder, consolidated your iTunes library, now it’s time for the backup.


Exit iTunes application


Connect your external hard drive to the computer and browse your computer to find it.


Look for a folder called “iTunes Media”. You’ll find this in the path we followed earlier.


When you locate the folder, click and drag it to the external hard drive. This will copy your iTunes library to the hard drive.


Once the transfer is successful, you’ll now have your iTunes library backed up in your external hard drive.


Disconnect the external hard drive.
Also Read:How to Delete Embarrassing Word Suggestions from Android Keyboard

Also Read:5 Best Video to MP3 Converter to Extract Audio from Video Files

We have looked at how to save iTunes library to iPhone using an awesome transfer tool called iMyFone TunesMate and also how to save iTunes library to an external hard drive. No doubt there are lots of iOS users that are not aware they can easily backup their entire iTunes library. We are glad you read this article today and we want you to create a backup today, it’s easy and can be done in just a few minutes.

How to Remove Device from iCloud on iPhone 2019


How to Remove Device from iCloud on iPhone

The first way we recommend to delete a device off iCloud is using an iPhone, iPad or iPod touch. Just follow these steps:


Go to Settings on your iPhone.


Locate iCloud. Tap your iCloud name.


Once you have accessed iCloud, go to your account details screen and choose “Devices”. You will see all devices synced to your iCloud account here.


Tap on the device you want gone and click Remove From Account. A verification message will pop up, Click “Remove” to confirm then the device will be gone from the list.


How to Delete Device off iCloud on Mac

You can use the following steps to delete your device off iCloud on your mac.


Launch “System Preference” on your Mac and click on “iCloud” to open it.


Click on “Account Details” on the left side of the screen. You will see a password prompt that requires your Apple ID password. Enter your password and click “Continue”.


On the Account Details window, tap on “Devices”.


Highlight the device you want to remove and Click “Remove From Account”.


Tap “Remove” from the pop-up confirmation window.


How to Remove Device from iCloud via Official Website

Or you can delete a device off iCloud via the icloud.com site.


Go to “Settings > iCloud” on your device. Then turn off “Find My iPhone”. Alternatively, you can reset your Apple device to factory settings.


Go to iCloud.com on your browser. Sign in with your iCloud account.


Navigate to Find iPhone on your iCloud account.


Then click “All Devices” and choose the offline device.
Click on “Remove from Account” and the device will be removed from your iCloud account.


Note: You may see "Erase iPhone" option there which is different from "Remove from Account". "Erase iPhone" not only removes the device but also erase all contents and settings from iPhone.
Final Words

It’s very convenient that you have 3 choices to remove a device from iCloud. But since it doesn’t erase the data from the device, if you worry about your private data entering the wrong hands, take advantages of iMyFone Umate Pro. With it, you no longer have anything to worry about.Sponsor ads:

Gihosoft Free iPhone Data Recovery:https://www.gihosoft.com/iphone-data-recovery-free.html

Gihosoft iPhone Data Recovery Free

Free iPhone Data Recovery Software for Windows/Mac

Recover up to 12+ types of files, including contacts, SMS, photos, WhatsApp, Viber, notes, etc.

Restore lost data from iOS devices directly or from iTunes and iCloud backup

Recover iPhone data lost due to iOS upgrade/jailbreak, accidental deletion, device lost or broken

Support all the latest iPhone, iPad and iPod Touch

Both Free and Pro version.

If you lost data after you updated to a new iPhone, you can always use Gihosoft iPhone Data Recovery to get the data back from the old iPhone or backup.You may also like: iphonerecovery.com

If you use android phones, please choose Gihosoft Android Data Recovery.

With Gihosoft Android Data Recovery, no longer afraid of data loss!

Must read:Youtube video downloader for pc

Gihosoft RePicvid Free Photo Recovery Software provides a free photo recovery software for windows to help users recover the deleted or lost photo for free.

Jihosoft Android Data Recovery: the best Android Data Recovery software for Windows and Mac to recover deleted contacts, messages, photos, videos, WhatsApp and etc from Android devices.Tips:How to transfer messages from iPhone to iPhone

jihosoft Free iPhone Data Recovery

Friday, March 1, 2019

Find & View iMessages on Other Multiple Devices like Mac


1: Find & View iMessages on Other Multiple Devices like Mac
How to Set up iMessages on Mac First


Start by opening the messages application on Mac.


Afterwards, you need to enter your password and Apple ID email address. You also need to enter your verification code if the two-step or two-factor authentication has been turned on .

Also Read:Windows Media Player Won’t Play AVI Troubleshooting

Also Read:9 Best Equalizer Apps for iPhone & iPad (iOS 12): Get Ultimate Music Experience


The next step is to click on the menu bar found in the messages then go to preferences.


Go to the account tab.


Now select the phone number and email address you need.


Choose the email address or phone number that the person will see if you start a new conversation.


Find and View iMessages on Mac

The archive of every device holds all the past messages from specific conversations which were either closed or saved. On the other hand, the attachments may be containing the files and images or videos sent through those conversations. In that case, to find and view your iMessages on your Mac device, there are simple steps that you should follow:


Go to the messages on Mac and then select preferences.


Proceed and look out for a box that says “save messages when the conversations are closed”.


In your finder, proceed to the Go menu where you should select the Go to Folder option.


Here, you should type: ~/Library/Messages.


You will see two folders: Archive and Attachments. Also, you will see the file database which labeled as chat.db.


You should then open the folders, and the conversations will appear in the Messages. You can only copy and paste sentences from the messages you want.


In summary, we hope the above steps will help you manoeuvre through the iMessages easily. Operating iMessages from your Mac is not as hard as people claim. Follow the simple 3-minute procedures given for a better iMessages experience. If you like them, feel free to leave a review of your experience in the comments box below.

Sponsor ads:

Gihosoft Free iPhone Data Recovery:https://www.gihosoft.com/iphone-data-recovery-free.html

Gihosoft iPhone Data Recovery Free

Free iPhone Data Recovery Software for Windows/Mac
Recover up to 12+ types of files, including contacts, SMS, photos, WhatsApp, Viber, notes, etc.

Restore lost data from iOS devices directly or from iTunes and iCloud backup

Recover iPhone data lost due to iOS upgrade/jailbreak, accidental deletion, device lost or broken

Support all the latest iPhone, iPad and iPod Touch

Both Free and Pro version.

If you lost data after you updated to a new iPhone, you can always use Gihosoft iPhone Data Recovery to get the data back from the old iPhone or backup.You may also like: iphonerecovery.com

If you use android phones, please choose Gihosoft Android Data Recovery.

With Gihosoft Android Data Recovery, no longer afraid of data loss!

Must read:Youtube video downloader for pc

Gihosoft RePicvid Free Photo Recovery Software provides a free photo recovery software for windows to help users recover the deleted or lost photo for free.

Jihosoft Android Data Recovery: the best Android Data Recovery software for Windows and Mac to recover deleted contacts, messages, photos, videos, WhatsApp and etc from Android devices.Tips:How to transfer messages from iPhone to iPhone


jihosoft Free iPhone Data Recovery